IssueOps: Self-Service Automation with GitHub Issues and Actions
How to use GitHub Issues as a self-service portal for automation, including repo creation, JIT access, and Actions onboarding, powered by issue forms and GitHub Actions
Overview
If you need a self-service portal for your GitHub organization but don’t want to build a custom web app, you already have one: GitHub Issues.
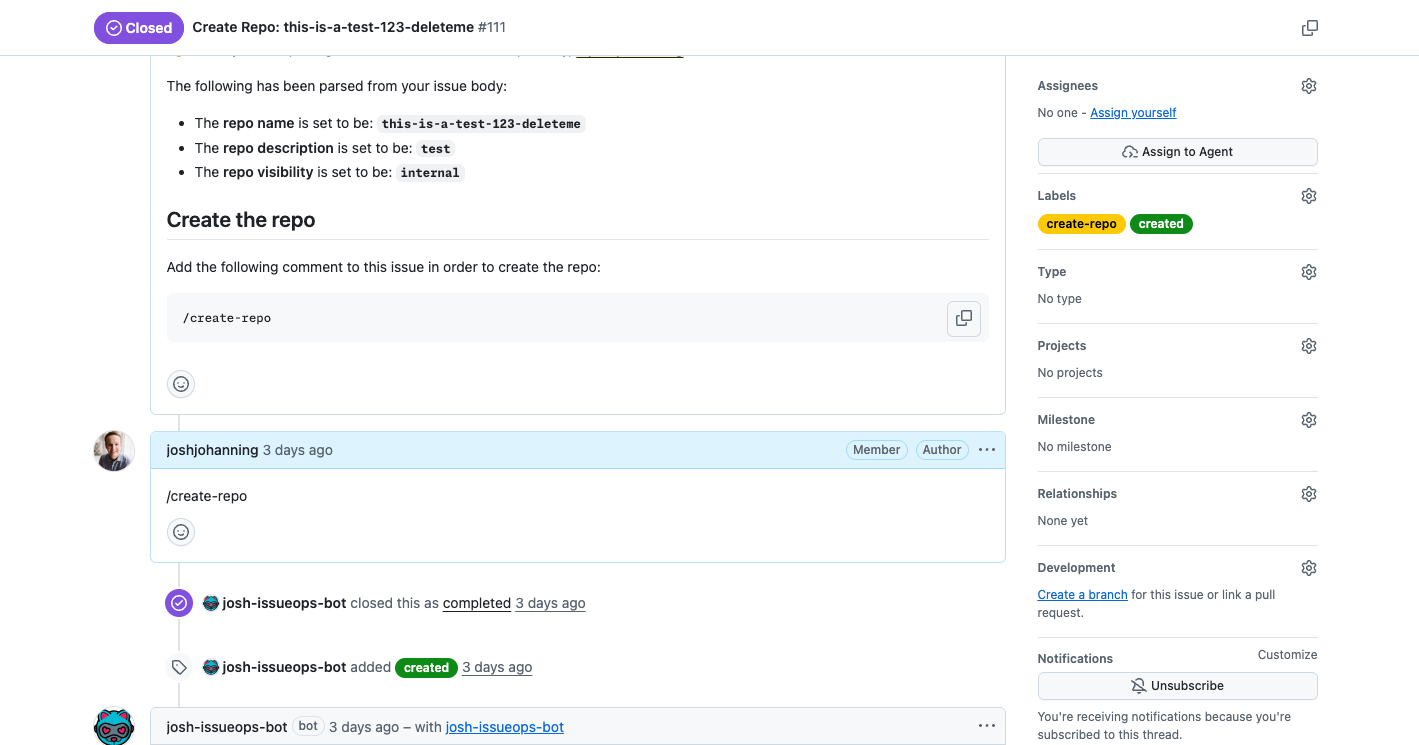
IssueOps is the practice of using GitHub Issues as the UI, issue forms as the input, and GitHub Actions as the automation backend. Users fill out a form, a workflow parses the input and performs the action, and status updates are posted back to the issue as comments. Everything is transparent, auditable, and lives right in GitHub.
I first wrote about this pattern in my ApproveOps post, where I built an approval workflow on top of IssueOps for a migration use case. Since then, I’ve used it for repository management, access requests, and Actions onboarding. I’ll walk through how I typically set it up and a few things I’ve learned along the way.
For a deeper dive into IssueOps workflows, including how requests move through different states, check out the GitHub Blog post on IssueOps.
Why IssueOps?
There are several reasons IssueOps works well for platform and DevOps teams:
- Built-in request interface: issue forms give you dropdowns, checkboxes, text inputs, and validation out of the box
- Transparent and auditable: every request, approval, and result is logged in the issue timeline
- Works with GitHub access controls: repository permissions determine who can view and interact with requests, while workflows can add authorization checks for sensitive commands
- Discoverable: users don’t need to learn a new tool; they just open an issue
- Uses tools you already have: there is no additional infrastructure to host beyond GitHub Issues and Actions
A Typical IssueOps Workflow
Most of my IssueOps implementations use:
- A
prepareworkflow that runs after an issue is created to validate and summarize the request - A
runworkflow that executes the action after a slash command comment confirms the request
You don’t have to do it this way; you could automatically have the execution phase trigger immediately after creating an issue, but I prefer to give the user more control and an opportunity to review and confirm their request before any action is taken.
The Prepare Workflow (triggered by issue creation)
When a user opens an issue using the issue form template, the prepare workflow:
- Triggers on the
issues: [opened]event - Parses the issue body using the
issue-ops/parseraction - Validates the inputs
- Posts a summary comment back to the issue with a slash command to confirm
1
2
3
4
5
6
7
8
9
10
11
12
13
14
15
16
17
18
19
20
21
22
23
24
25
26
27
28
29
30
31
32
33
34
35
36
37
38
39
40
41
42
43
44
45
46
47
48
49
50
51
52
53
54
55
56
57
58
59
60
61
name: create-repo-prepare

on:
  issues:
    types: [opened]

jobs:
  prepare:
    runs-on: ubuntu-latest
    if: contains(github.event.issue.labels.*.name, 'create-repo')
    permissions:
      contents: read
      issues: write

    steps:
      - uses: actions/checkout@v4

      - uses: actions/create-github-app-token@v2
        id: app-token
        with:
          app-id: ${{ vars.APP_ID }}
          private-key: ${{ secrets.PRIVATE_KEY }}
          owner: ${{ github.repository_owner }}

      - name: Parse Issue
        id: parser
        uses: issue-ops/parser@v4
        with:
          body: ${{ github.event.issue.body }}

      - name: Post prepare message
        uses: actions/github-script@v7
        env:
          INPUTS_JSON: ${{ steps.parser.outputs.json }}
          REQUESTOR: ${{ github.actor }}
        with:
          github-token: ${{ steps.app-token.outputs.token }}
          script: |
            const inputs = JSON.parse(process.env.INPUTS_JSON)
            const commentBody = `👋 Thank you for your request, @${process.env.REQUESTOR}.

            The following has been parsed from your issue:
            - **Repo name:** \`${inputs.repo_name}\`
            - **Description:** ${inputs.repo_description}
            - **Visibility:** \`${inputs.repo_visibility}\`

            ## Create the repo

            Add the following comment to this issue to proceed:

            \`\`\`
            /create-repo
            \`\`\`
            `

            await github.rest.issues.createComment({
              owner: context.repo.owner,
              repo: context.repo.repo,
              issue_number: context.issue.number,
              body: commentBody
            })
The Run Workflow (triggered by an issue comment)
When someone comments with the slash command (e.g., /create-repo), the run workflow:
- Triggers on the
issue_comment: [created]event - Checks the comment body for the slash command
- Parses the issue body again (to get the original inputs)
- Performs the action (creates the repo, grants access, etc.)
- Posts a success/failure comment and closes the issue
For sensitive actions, don’t treat knowledge of the slash command as authorization. The workflow should verify that the person commenting is allowed to perform the action, such as by checking team membership before continuing.
1
2
3
4
5
6
7
8
9
10
11
12
13
14
15
16
17
18
19
20
21
22
23
24
25
26
27
28
29
30
31
32
33
34
35
36
37
38
39
40
41
42
43
44
45
46
47
48
49
50
51
52
53
54
55
56
57
58
59
60
61
62
63
64
65
66
67
68
69
name: create-repo-run

on:
  issue_comment:
    types: [created]

jobs:
  create:
    runs-on: ubuntu-latest
    if: startsWith(github.event.comment.body, '/create-repo') &&
      contains(github.event.issue.labels.*.name, 'create-repo')
    permissions:
      contents: read
      issues: write

    steps:
      - uses: actions/checkout@v4

      - uses: actions/create-github-app-token@v2
        id: app-token
        with:
          app-id: ${{ vars.APP_ID }}
          private-key: ${{ secrets.PRIVATE_KEY }}
          owner: ${{ github.repository_owner }}

      - name: Parse Issue
        id: parser
        uses: issue-ops/parser@v4
        with:
          body: ${{ github.event.issue.body }}

      - name: Create repository
        uses: actions/github-script@v7
        env:
          REPO_NAME: ${{ fromJson(steps.parser.outputs.json).repo_name }}
          REPO_DESCRIPTION: ${{ fromJson(steps.parser.outputs.json).repo_description }}
          REPO_VISIBILITY: ${{ fromJson(steps.parser.outputs.json).repo_visibility }}
        with:
          github-token: ${{ steps.app-token.outputs.token }}
          script: |
            await github.rest.repos.createInOrg({
              org: context.repo.owner,
              name: process.env.REPO_NAME,
              description: process.env.REPO_DESCRIPTION,
              visibility: process.env.REPO_VISIBILITY,
              auto_init: true,
            })

      - name: Post success and close
        if: success()
        uses: actions/github-script@v7
        env:
          REPO_NAME: ${{ fromJson(steps.parser.outputs.json).repo_name }}
        with:
          github-token: ${{ steps.app-token.outputs.token }}
          script: |
            await github.rest.issues.createComment({
              owner: context.repo.owner,
              repo: context.repo.repo,
              issue_number: context.issue.number,
              body: `🚀 Repository created: [${process.env.REPO_NAME}](${{ github.server_url }}/${{ github.repository_owner }}/${process.env.REPO_NAME})`
            })
            await github.rest.issues.update({
              owner: context.repo.owner,
              repo: context.repo.repo,
              issue_number: context.issue.number,
              state: 'closed',
              labels: ['created', 'create-repo']
            })
Issue Form Templates
The UI-based issue form template is what makes IssueOps feel like a self-service portal of sorts. Users get dropdowns, checkboxes, and validated text inputs instead of traditional free-form markdown:
1
2
3
4
5
6
7
8
9
10
11
12
13
14
15
16
17
18
19
20
21
22
23
24
25
26
27
28
29
30
31
32
name: 🆕 Create Repo
description: Create a new repo with IssueOps
title: "Create Repo"
labels: ["create-repo"]
body:
  - type: input
    id: repo_name
    attributes:
      label: Repo Name
      description: Enter in the name of the new repository
      placeholder: repo-name
    validations:
      required: true
  - type: input
    id: repo_description
    attributes:
      label: Repo Description
      description: Enter in the description of the new repository
      placeholder: repo-description
    validations:
      required: true
  - type: dropdown
    id: repo_visibility
    attributes:
      label: Repo Visibility
      description: Please select the visibility for the new repository
      options:
        - internal
        - private
        - public
    validations:
      required: true
Issue form templates give you structured inputs with validation. The
issue-ops/parseraction can parse the issue body into JSON, making it easy to extract values in your workflow.
Using a GitHub App for Authentication
You’ll notice I’m using actions/create-github-app-token instead of the default GITHUB_TOKEN. This is important for IssueOps because:
- Cross-repo permissions: the default
GITHUB_TOKENis scoped to the current repo. If you’re creating repos, managing teams, or granting access, you need a token with broader org-level permissions. - Bot identity: comments posted with a GitHub App token show up as the app (with its avatar), making it clear that the comment is from automation, not a person.
- Team mentions: a GitHub App token can properly
@mentionteams in comments, whichGITHUB_TOKENcan’t do.
For more on setting up GitHub Apps, see my post on Demystifying GitHub Apps.
Use Case Ideas
IssueOps is flexible enough to handle a wide variety of self-service scenarios. Here are some ideas I’ve implemented or seen work well:
Repository CRUD Operations
The most common IssueOps use case. Issue forms for creating, deleting, archiving, renaming, and changing visibility of repositories. See my issueops-samples repo for working examples of repo creation and deletion.
JIT (Just-In-Time) Repository Admin Access
Grant temporary admin access to a repository. A user requests access via an issue, an approver comments /approve, and the workflow grants the user admin access and schedules a removal after a set time period (e.g., 24 hours). This works well for break-glass scenarios where someone needs elevated access temporarily.
JIT Collaborator Access
Similar to JIT admin, but for granting outside collaborator access to a repository. Useful for contractors or external partners who need short-term access. The issue serves as the access request, the approval trail, and the audit log all in one.
Actions Onboarding
When a team is adopting GitHub Actions, use IssueOps to onboard them. The issue form collects the team name, repositories, language, and which workflows they want. The automation creates environments, adds starter workflows via pull requests, and configures Dependabot - all from a single issue.
See my reusable-workflow-issueops-onboarder for a working example of this pattern, where it creates a pull request with the appropriate reusable workflow call based on the language and configuration selected.
Label Management
Use issue comments to manage labels across repos. For example, commenting /add-label security on an issue could create or update that label across a set of repositories. This is useful for org-wide label standardization.
Tips for Running IssueOps at Scale
Use Labels to Route Workflows
Labels are how you associate issue form templates with the right workflow. Each template should add a unique label (e.g., create-repo, delete-repos, jit-access), and your workflows should filter on that label:
1
if: contains(github.event.issue.labels.*.name, 'create-repo')
This prevents your workflow from triggering on every issue in the repo.
Use run-name for Clarity
Add a descriptive run-name so your Actions tab is easy to scan:
1
run-name: 'Create Repo: Issue #${{ github.event.issue.number }} by @${{ github.actor }}'
Set Values to Environment Variables to Prevent Script Injection
When using parsed issue body values in scripts, always set them to environment variables first instead of interpolating them directly. This prevents script injection attacks:
1
2
3
4
- name: Use parsed value safely
  env:
    REPO_NAME: ${{ fromJson(steps.parser.outputs.json).repo_name }}
  run: echo "Creating repo: $REPO_NAME"
Never directly interpolate user input from issue bodies into
run:scripts. Always use environment variables or action inputs to prevent script injection.
Post Failure Comments
Always include a failure step that posts a comment with a link to the Action logs. Otherwise, users won’t know something went wrong unless they check the Actions tab:
1
2
3
4
5
6
7
8
9
10
11
- name: Post failure message
  if: failure()
  uses: actions/github-script@v7
  with:
    script: |
      await github.rest.issues.createComment({
        owner: context.repo.owner,
        repo: context.repo.repo,
        issue_number: context.issue.number,
        body: `😢 Something went wrong. Review the [action logs](${{ github.server_url }}/${{ github.repository }}/actions/runs/${{ github.run_id }}) for details.`
      })
Separate Prod and Dev IssueOps Repos
One wrinkle with developing IssueOps workflows is that workflows triggered by issues or issue_comment must exist on the default branch to run. Testing changes in the production request repo can be awkward because you have to merge the workflow before you can try it, potentially breaking teams that are relying on it.
For teams running IssueOps in production, I recommend maintaining two repos:
issueops(prod): the repo users interact with to submit requestsissueops-dev(non-prod): where you merge and test workflow changes first
Once the changes have been tested in the dev repo, sync them to the production repo. You can automate that promotion with the bulk-github-repo-sync-action, and you could even use another IssueOps workflow to request and approve the sync.
Add Approvals with ApproveOps
If certain IssueOps actions require approval (e.g., deleting a repo, granting admin access), you can layer in approval requirements using the ApproveOps pattern. Require someone from a designated team to comment /approve before the action executes.
Summary
IssueOps turns GitHub Issues into a practical interface for self-service automation. Issue forms collect the request details, GitHub Actions runs the automation, and the issue timeline keeps a record of the request and its result.
Check out my issueops-samples repo for working examples, and the GitHub Blog post on IssueOps for the conceptual deep dive. 🚀