Demystifying GitHub Apps: Using GitHub Apps to Replace Service Accounts
Creating no-code GitHub Apps to install to an organization to replace having to create service accounts or a user PAT for authorization in GitHub Actions
Overview
In GitHub Actions, the GitHub Token works very well and is convenient for automation tasks that require authentication, but its scope is limited. The GitHub Token is only going to allow us to access data within the repository (such as issues, code, packages), but what if you need to authenticate to another repository, or access organizational information such as teams or member lists? GitHub Token is not going to work for that. Your alternatives are:
- Use someone’s Personal Access Token (PAT) - but what happens if that person leaves? Or if you need to write back to an issue, for example, it’s going to look like it came from that user
- Create a service account - but this is going to consume a license, and you still have to manage with vaulting and storing a long-lived PAT somewhere, and if that PAT gets exposed, you’re opening yourselves up to a huge security risk
- Creating a GitHub App and using it for authentication! 🚀
In this post, I will go through the setup and usage of GitHub Apps in an Actions workflow with two scenarios: Using a GitHub App to grant access to a single repository and Using a GitHub App as a rich comment bot.
And don’t worry - you don’t need any programming experience to create a GitHub App!
For programmatic installation and management of GitHub Apps across multiple organizations in an Enterprise, see my guide on Enterprise GitHub Apps.
GitHub Apps
GitHub Apps are certainly preferred and recommended from GitHub. From GitHub’s documentation, this fits our exact use case:
GitHub Apps are the official recommended way to integrate with GitHub because they offer much more granular permissions to access data.
GitHub Apps are first-class actors within GitHub. A GitHub App acts on its own behalf, taking actions via the API directly using its own identity, which means you don’t need to maintain a bot or service account as a separate user.
GitHub Apps also have a higher API rate limiting threshold than requests from user accounts. Installed in an Enterprise, GitHub Apps can have up to 15,000 requests per hour whereas user-created personal access tokens have a limit of 5,000 requests per hour. For non-Enterprise organizations, there is a formula that is used to calculate the rate limit based on the number of users in the organization, but it’s still higher than the 5,000 requests per hour that a user-created personal access token has.
When authenticating with the GITHUB_TOKEN in a GitHub Actions workflows in an Enterprise organization, you also have access to the 15,000 requests per repository per hour. Outside of an Enterprise organization, you’re limited to 1,000 requests per hour. However, the GITHUB_TOKEN in the Actions workflow expires when the workflow is complete and can only access resources inside of the repository calling the workflow. It cannot access resources outside of the repository, such as other repositories or organizational resources.
Caveats
- Each organization can only own up to 100 GitHub Apps
- You’ll have to be an organization owner to create an app that’s owned by the organization, and only organization owners can install a GitHub App
- Non-organization owners can be designated as GitHub App managers to be able to create and update GitHub Apps owned by the organization (this is a better way than being owned by a user account)
- Non-organization owners can also create a GitHub App owned by their user account and request it to be installed by the org, but it will be owned by the user and not the organization (not recommended)
- Each installation access token is only valid for a maximum of one hour
- But the fact that it does expire is a good thing!
- GitHub Apps can’t be used to authenticate to GitHub Packages (have to use a personal access token)
- If you make a GitHub App private, other apps can’t see it / interact with it
- Example: You can’t use GitHub App A to modify a branch protection policy to let GitHub App B to bypass the policy if GitHub App B is private - GitHub App B would have to be a Public app
Creating a GitHub App
Creating a GitHub App is pretty straightforward! I’ll defer to GitHub’s documentation for the details, but here’s a quick overview:
Organization owner or GitHub App manager permissions are required in order to create a GitHub App on behalf of an organization. You can create a GitHub App in your user account and request it to be installed to the organization, but long term it’s better to have the GitHub App owned by the organization.
- Navigate to the organization’s settings page
- Expand the “Developer Settings” section at the bottom of the page and navigate to GitHub Apps
- Click “New GitHub App” in the upper right-hand corner
- Start filling in the details!
- The name and Homepage URL doesn’t matter much right now (but it does need a valid URL here)
- (Optional - for use with webhooks) - If you want the GitHub App to send webhooks based on events, and want an easy way to inspect the payload that is being sent, you can use something like smee.io to create a channel and use the URL of the channel as the Webhook URL
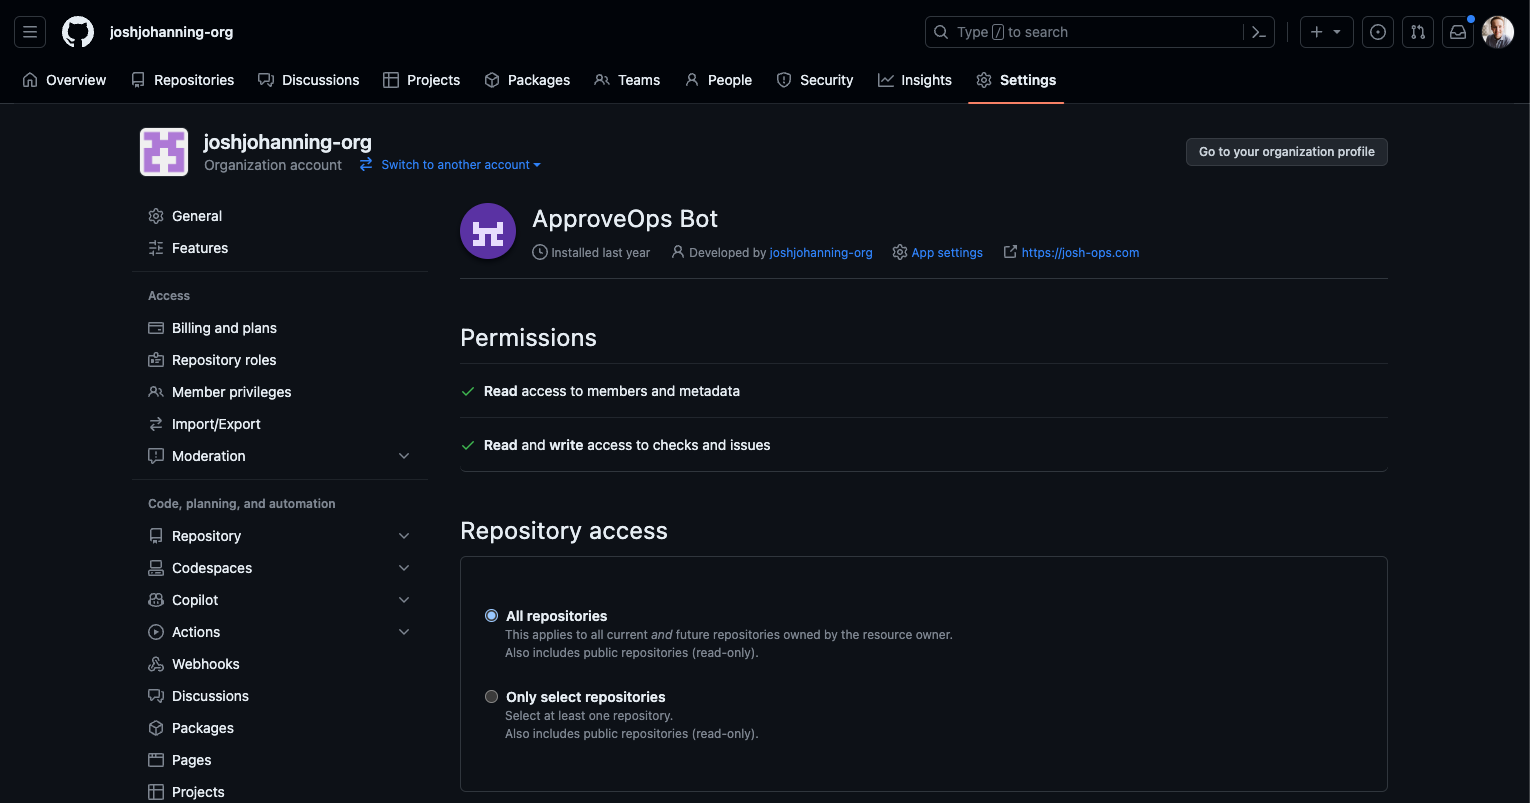
- Grant it the repository permissions, organization permissions, user permissions, and what events to subscribe to - for the examples in this blog post, we’ll grant read-only access to
repository / contents, read & write access torepository / issues, and read-only access toorganization / members- if you change this after the it’s already been installed to an organization, you’ll have review and re-approve the permission changes for the GitHub App - After creation, you should see the App ID - we will need this later on
- (Optional - for use with webhooks) - After creation, you should see a “ping” entry in your smee.io channel - this is a confirmation that the app was created - the App ID is also available in this payload
- Scroll down and generate a private key for the app - download the file and grab the contents of the certificate by opening it in VSCode or if you are on macOS, use the command to copy to your clipboard:
cat approveops-bot.2022-02-07.private-key | pbcopy - Scroll back up and in the left-hand menu, click on the “Install App” link and install the app to the organization
- Determine if you will grant the app access to all repos in an organization, or only to selected repo(s)
- After installing the app, pay attention to the URL in the browser (see screenshot below) - the number at the end of the URL is the installation ID, and depending on how you’re using the app, you may need this
- (Optional - for use with webhooks) - In your smee.io channel, you should have a new payload from the installation - expand the “installation” property to find your “installation ID”
🎉 With the app installed and knowing the App ID, Installation ID, and Private Key, we now have everything we need to generate an installation token use the app in Actions! 🥳
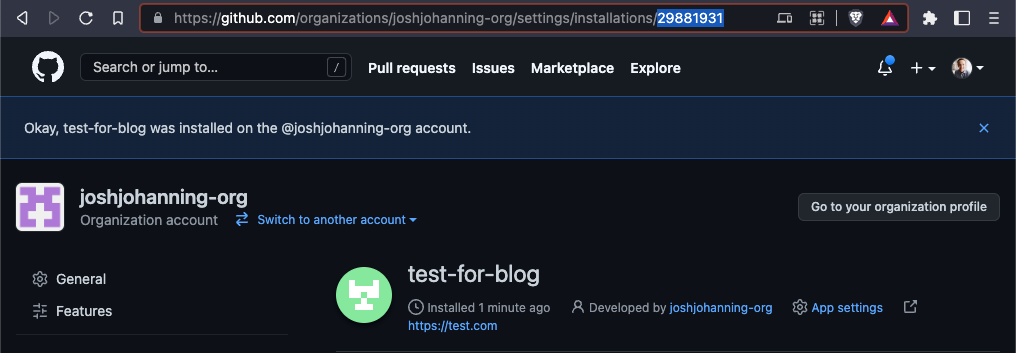 An example of an Installation ID in the address bar after installing a GitHub App
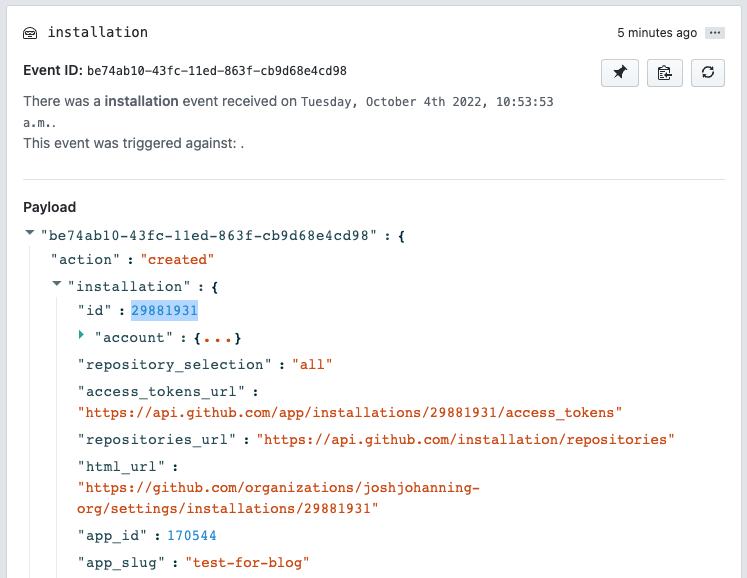 An example of an Installation ID and App ID from a payload in smee.io
Using the GitHub App in a GitHub Actions workflow
Now that GitHub has a first-party action, I tend to always prefer to use that one:
It’s really quite simple to use an app in Actions now that you have the app ID, the org name, and the private key. The only prerequisite is to create a secret on the repository (or organization) with the private key’s contents, taking care not to modify the key’s value in any way. I named my secret PRIVATE_KEY.
There are other popular actions in the marketplace that I have used in the past, for reference:
Different actions ask for different things: sometimes the app ID and installation ID and sometimes the app ID and org name. The installation ID is tied to the org (each org an app is installed to has a unique installation ID). If you need it for another action, the installation ID is available in the URL when you install the app. We are always going to need use the private key though.
Scenario 1: Using a GitHub App to grant access to a single repository
A customer had a repository that nearly every Actions workflow was going to need to access at deploy-time. For the proof of concept, one of the admins on the team created a PAT and added it as an organizational secret. The problem is though that if the PAT is compromised, that PAT has access to all the repositories in the organization.
If there’s a centralized repository that every team needs to access, you can use the GitHub App to grant access to that repository and that repository alone. Note that you could also use deploy keys for this, but that requires you to use the SSH protocol when cloning. We’ll continue as if the GitHub App is the preferred way to go so that you can understand the process.
Here’s the action code to generate and sign an installation access token for authenticating with GitHub:
1
2
3
4
5
6
7
8
9
10
11
12
13
14
15
16
17
18
19
20
21
22
23
24
25
26
27
28
29
30
31
32
33
34
35
36
37
    steps:
      - uses: actions/create-github-app-token@v1
        id: app-token
        with:
          app-id: ${{ vars.APP_ID }}
          private-key: ${{ secrets.PRIVATE_KEY }}
          # optional: owner not needed IF the app has access to the repo running the workflow
          #   if you get 'RequestError [HttpError]: Not Found 404', pass in owner
          owner: ${{ github.repository_owner }}

      # example 1a - cloning repo - clone using the `actions/checkout` step
      - name: Checkout
        uses: actions/checkout@v4
        with:
          repository: my-org/my-repo-2
          token: ${{ steps.app-token.outputs.token }}
          path: my-repo

      # example 1b - cloning repo - using git clone command
      - name: Clone Repository
        run: |
          mkdir my-repo-2 && cd my-repo-2
          git clone https://x-access-token:${{ steps.app-token.outputs.token }}@github.com/my-org/my-repo.git

      # example 2a - api - call an api using curl
      - name: Get Repo (curl)
        run: |
          curl \
            -H "Authorization: Bearer ${{ steps.app-token.outputs.token }}" \
            https://api.github.com/repos/joshjohanning-org/composite-caller-1

      # example 2b - api - call an api using the GitHub CLI
      - name: Get Repo (gh api)
        env:
          GH_TOKEN: ${{ steps.app-token.outputs.token }}
        run: |
          gh api /repos/joshjohanning-org/composite-caller-1
With the GitHub App only having access to the my-org/my-repo-2 repository and passing in the owner to the action, we can clone the other repository even though it’s not the repository running the workflow. We can also use the token generated here as a Bearer token for GitHub API requests or set the GH_TOKEN environment variable for gh CLI commands, assuming the app has the proper access to call the API endpoint(s).
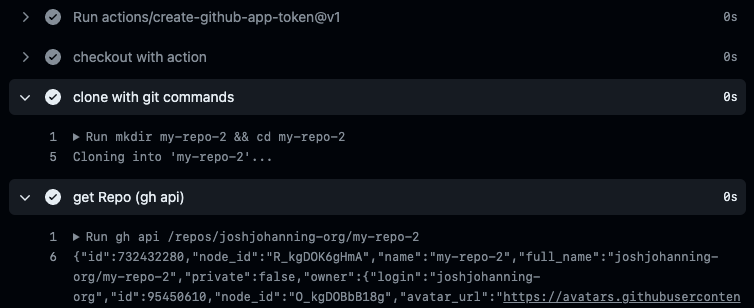 Using a GitHub App’s credentials to clone a repo and query the API
🎉 We can clone the repo as well as query the API without using a PAT! 🥳
Scenario 2: Using a GitHub App as a rich comment bot
I’ll often use the peter-evans/create-or-update-comment action to create a comment on a pull request or issue. Typically, I’ll just use the ${{ secrets.GITHUB_TOKEN }} for the token which comments as the github-actions bot, and it works great!
 GitHub Actions Comment Bot using GitHub Token from the Action run
However, if you look closely, you might notice something: since the GitHub Token only has access to the repository, it can’t create the proper @team mention in the comment. There is no hyperlink there. This might not be super important, but in my case the team was going to use their GitHub notifications to check if there were any issues that needed their attention, so this wasn’t going to work.
If we use a PAT and a secret on the repository, we get the @team mention, but it looks like it came from the user who created the PAT:
 Issues comment from GitHub Actions using a PAT
Instead, we can use a GitHub App that with read-only permissions on Organization / Members and read & write on Repository / Issues to create the comment and then we’ll have the mention as well as not coming from a regular user:
 Issues comment from GitHub Actions using a GitHub App
Here’s the relevant action code:
1
2
3
4
5
6
7
8
9
10
11
12
13
14
15
16
17
    steps:
      - uses: actions/create-github-app-token@v1
        id: app-token
        with:
          app-id: ${{ vars.APP_ID }}
          private-key: ${{ secrets.PRIVATE_KEY }}

      - if: ${{ steps.check-approval.outputs.approved == 'false' }}
        name: Create completed comment
        uses: peter-evans/create-or-update-comment@v1
        with:
          token: ${{ steps.app-token.outputs.token }}
          issue-number: ${{ github.event.issue.number }}
          body: |
            Hey, @${{ github.event.comment.user.login }}!
            :cry:  No one approved your run yet! Have someone from the @joshjohanning-org/approver-team run `/approve` and then try your command again
            :no_entry_sign: :no_entry: Marking the workflow run as failed
You’ll notice that we didn’t have to pass in an owner input this time to the action. This is because the GitHub App is installed on the repository running the action, and therefore the action can find the app’s installation dynamically to create the token.
🎉 Issue comment with team mentioning success! 🥳
Check out my next post, ApproveOps: Approvals in IssueOps, for more information on the approval action workflow I’m using above.
Generating the GitHub App Installation Token Locally
If you wanted to be able to generate a token locally, whether for scripting not being ran in Actions or simply to test out an app’s permissions, you can use the Link-/gh-token gh CLI extension.
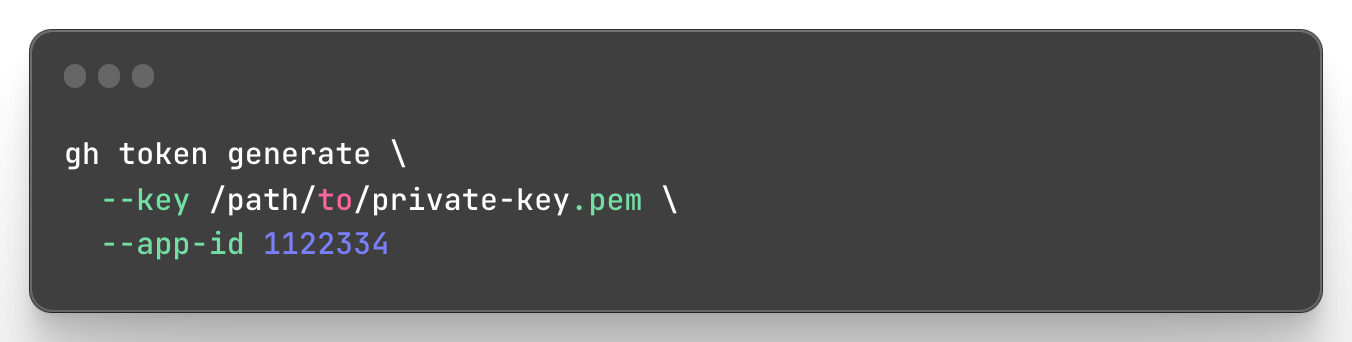 Generating a GitHub App Installation Token with a
 gh CLI extension
You can tweak this such that it returns an installation token for a particular installation ID with:
1
2
3
4
5
gh token generate \
  --app-id 1122334 \
  --installation-id 12345678 \
  --key /path/to/private-key.pem \
  --token-only
Summary
When I first learned about GitHub Apps, I was like, “This is cool, but I’m not going to be writing an app and creating code just for authentication, that’s too much work, I’ll just use a PAT.” However, as you just saw, we created a GitHub App and used it for authentication without tying it to any code.
In both scenarios, we use the actions/create-github-app-token action and the installation access token that is an output parameter: ${{ steps.app-token.outputs.token }}. We use this token to make authenticated requests to the API or as the password in Git clones. Alternatively, GitHub has sample Ruby code for creating a and signing the JWT and retrieving an installation ID, but the action is so much simpler!
Hurrah to GitHub Apps and never having to generate a long-lived PAT again! 🔐 🚀