Powerlevel10k Zsh Theme in GitHub Codespaces
How to use the Powerlevel10k Zsh theme in GitHub Codespaces
Overview
Hello 👋 ! This is my first post since joining the GitHub FastTrack team last week. I’m still learning a lot of information as well as tips and tricks from other Hubbers. One of the things I have started playing around more with now is GitHub Codespaces. I wanted to have my GitHub Codespace to have the exact same look and feel that my local environment had - including my Zsh plugins and Zsh theme: Powerlevel10k. I found a post from Burke Holland that got me close, but it didn’t have the Powerlevel10k bit in it.
If you are interested to seeing my local development environment setup, see: My macOS Development Environment: iTerm2, oh-my-zsh, and VS Code
What is GitHub Codespaces?
I’ll try not to belabor the point, but GitHub Codespaces is a convenient way for teams to build a consistent development environment baseline that everyone can tap into. Gone are the days where the amount of time spent setting up a new development environment when switching teams or receiving a new laptop is measured in DAYS. I could use a machine (or iPad!) anywhere in the world, and if I connected to my Codespace, I could start development immediately.
By default, Codespaces is instantiated with a base Ubuntu image that has a few languages and runtimes pre-installed. To further customize the experience, a development container can be created that has all of the prerequisites installed, the proper versions of those prerequisites, and anything else that a team might need in order to compile/test the code. The concept of a development container (aka dev container) is not necessarily new; you can use a development container in your local instance of VS Code with Docker (more info on using dev container here). What is new, though, is running this directly in your browser!
Yes you read right - right in your browser! A compute instance powers the developer’s environment, allowing for all development through a virtualized VS Code window in the browser! You can optionally connect your Codespace to your local VS Code if desired. There’s a toggle on the GitHub Codespaces main page that lets you see how the Codespace would look in the browser vs. desktop - and they are identical*.
* if you have the proper configuration setup and synced as mentioned in this post ;)
Setup VS Code Settings Sync
Before we configure Powerlevel10k, we need to make sure we set up VS Code settings sync. Even before I started at GitHub, I used my GitHub account to sync my settings. You could alternatively use a Microsoft account, but I think it makes more sense in this case to use a GitHub account since we will be launching a GitHub Codespace.
One of the things we need to make sure this is setup for is for the Terminal font that I have defined for the Powerlevel10k theme (MesloLGS NF), but you’d want your other VS Code settings to sync as well.
After firing up your Codespace, it should automatically sign you in and sync your settings and extensions, but if not, sign in manually.
Configure Powerlevel10k
There are a few steps:
1. Create a dotfiles repository
Now, we need to create a dotfiles repository - and it needs to be public. GitHub knows to use the dotfiles repository created under your username. For example, here is my dotfiles repository.
Bonus: I’ve cloned this repository locally and created a symlink from ~/.zshrc to ~/dotfiles/.zshrc. I followed this article, but I know others who have used the dotbot tool.
The steps can be summarized by:
1
2
3
git clone https://github.com/joshjohanning/dotfiles ~/dotfiles
mv ~/.zshrc ~/.zshrc/dotfiles
ln -s ~/dotfiles/.zshrc ~/.zshrc
2. Add your .zshrc and .p10k.zsh to your dotfiles repository
Add in your .zshrc and .p10k.zsh files to this repository!
My .zshrc and .p10k.zsh are linked, respectively.
If you followed something similar to the symlink example above, adding your .zshrc and .p10k.zsh file could be as simple as doing: git add .; git commit -m "adding dotfiles"; git push
3. Update your .zshrc file
You’re .zshrc likely hard codes your local user directory for the oh-my-zsh installation. Update it as such:
1
2
# Path to your oh-my-zsh installation.
export ZSH="/home/joshjohanning/.oh-my-zsh"
1
2
# Path to your oh-my-zsh installation.
export ZSH="${HOME}/.oh-my-zsh"
4. Create an install.sh file to install Zsh theme and plugins
Now, we need to make sure our Powerlevel10k theme and Zsh plugins are installed when the Codespace is initialized.
My install.sh script that I use that includes the Powerlevel10k setup is below:
1
2
3
4
5
6
7
8
9
10
11
12
13
14
15
16
17
18
19
20
21
22
23
24
25
26
27
28
29
30
31
32
33
34
35
36
37
#!/bin/sh

zshrc() {
    echo "==========================================================="
    echo "             cloning zsh-autosuggestions                   "
    echo "-----------------------------------------------------------"
    git clone https://github.com/zsh-users/zsh-autosuggestions ${ZSH_CUSTOM:-~/.oh-my-zsh/custom}/plugins/zsh-autosuggestions
    echo "==========================================================="
    echo "             cloning zsh-syntax-highlighting               "
    echo "-----------------------------------------------------------"
    git clone https://github.com/zsh-users/zsh-syntax-highlighting.git ${ZSH_CUSTOM:-~/.oh-my-zsh/custom}/plugins/zsh-syntax-highlighting
    echo "==========================================================="
    echo "             cloning powerlevel10k                         "
    echo "-----------------------------------------------------------"
    git clone --depth=1 https://github.com/romkatv/powerlevel10k.git ${ZSH_CUSTOM:-$HOME/.oh-my-zsh/custom}/themes/powerlevel10k
    echo "==========================================================="
    echo "             import zshrc                                  "
    echo "-----------------------------------------------------------"
    cat .zshrc > $HOME/.zshrc
    echo "==========================================================="
    echo "             import powerlevel10k                          "
    echo "-----------------------------------------------------------"
    cat .p10k.zsh > $HOME/.p10k.zsh
}

# change time zone
sudo ln -fs /usr/share/zoneinfo/America/Chicago /etc/localtime
sudo dpkg-reconfigure --frontend noninteractive tzdata

zshrc

# make directly highlighting readable - needs to be after zshrc line
echo "" >> ~/.zshrc
echo "# remove ls and directory completion highlight color" >> ~/.zshrc
echo "_ls_colors=':ow=01;33'" >> ~/.zshrc
echo 'zstyle ":completion:*:default" list-colors "${(s.:.)_ls_colors}"' >> ~/.zshrc
echo 'LS_COLORS+=$_ls_colors' >> ~/.zshrc
- The
cat .zshrc > $HOME/.zshrcandcat .p10k.zsh > $HOME/.p10k.zshlines here are pretty important - this is what takes the content you have in your dotfiles repository and move it to the$HOMEdirectory of the Codespace. - I also wanted the machine to have my local time zone. Whenever I would commit, I would see UTC time in my
git log. The GitHub UI translates this just fine, but my Jekyll blog theme uses thegit committimestamp when displaying the updated timestamp on the blog post, which I did not like since it was inconsistent with the posted time zone (where I’m using Central US). - The
zshrcline launches thezshcommand prompt when I launch my CodeSpace instead ofbash. And finally, when I would
lsor use the directory autocomplete suggestions, I would see a lime green blackground with blue text on directories which was unreadable. These lines remove the highlighting and simply use a distinct color for the directories instead: Directories are unreadable with default zsh configuration
 Directories readable again!
Important: Don’t git add this just yet! Continue to the next step.
This install.sh script is based on this post.
5. Mark the install script as executable with git
Kind of annoying, but if you don’t do this, you’ll notice that in your Codespaces creation logs that the install.sh script is not executable:
1
git add install.sh --chmod=+x
Note: After you run this command, you still might see that the install.sh file has a change that wants to be added/committed (viewed in the Source Control window in VS Code or with git status). Ignore or discard those changes (git restore install.sh).
If you’ve already added it, you can remove it and re-add it with:
1
2
git rm --cached install.sh
git add install.sh --chmod=+x
There’s an alternative command you can run to mark the file as executable in-place with git update-index --chmod=+x install.sh, but if you do that, every time you change the file the executable bit will get flipped off and you’ll have to run that command again. Inevitably, you will forget, and your Codespace’s Zsh environment will be broken.
You can view the Codespaces creation logs by opening the command palette (CMD/CTRL + Shift + P) and typing > Codespaces: View Creation Log
6. Link your dotfiles repo to Codespaces
Go to your GitHub Codespaces settings and make sure the ‘Automatically install dotfiles’ box is checked.
7. Set zsh as the default terminal in Codespaces
By default, Codespaces will open up a bash terminal window. We just did all of this work to pimp out our Codespace, we should make sure it loads the zsh terminal by default instead. Add this line to your VS Code settings.json file by opening the command palette (CMD/CTRL + Shift + P) and typing > Preferences: Open Settings (JSON) :
1
"terminal.integrated.defaultProfile.linux": "zsh"
This is an extended snippet of the relevant section in my VS Code’s settings.json :
1
2
3
    "terminal.integrated.shell.osx": "/bin/zsh",
    "terminal.integrated.defaultProfile.linux": "zsh",
    "terminal.integrated.fontFamily": "MesloLGS NF",
Note the font configuration!
8. Log into VS Code Settings Sync in the Codespaces
After firing up your Codespace, sign into VS Code Settings sync (I use GitHub_)
Gotchas
- Fonts - I was lucky as it seems that whatever configuration I had in my
.p10k.zshfile and my font choice for my VS Code terminal (MesloLGS NF) seemed to work out of the box - but I could imagine some headache if you used a more custom font. You can selectively not sync certain settings, so if you want a more default font to be used in your Codespace and a custom font to be used locally, you could probably do so. - If you are using the Brave Browser, the shield (AdBlock) functionality tends to show a degraded view of the terminal window. Flip that shield off for this site. Annoyingly, you have to do this for each Codespace you create, as there is not the ability to whitelist a subdomain - but there is a GitHub issue made for it. Full error with shields on for those interested:
Error loading webview: Error: Could not register service workers: NotSupportedError: Failed to register a ServiceWorker for scope (‘https://1c1b9171-108f-4374-9efc-20593a07163b.vscode-webview.net/stable/ccbaa2d27e38e5afa3e5c21c1c7bef4657064247/out/vs/workbench/contrib/webview/browser/pre/’) with script (‘https://1c1b9171-108f-4374-9efc-20593a07163b.vscode-webview.net/stable/ccbaa2d27e38e5afa3e5c21c1c7bef4657064247/out/vs/workbench/contrib/webview/browser/pre/service-worker.js?id=1c1b9171-108f-4374-9efc-20593a07163b&swVersion=2&extensionId=vscode.markdown-language-features&platform=browser&vscode-resource-base-authority=vscode-resource.vscode-webview.net&parentOrigin=https%3A%2F%2Fjoshjohanning-pipeline-templates-6497vrprh5r7v.github.dev’): The user denied permission to use Service Worker..
Summary
Take a look at our awesome development environment, all running from within our browser! 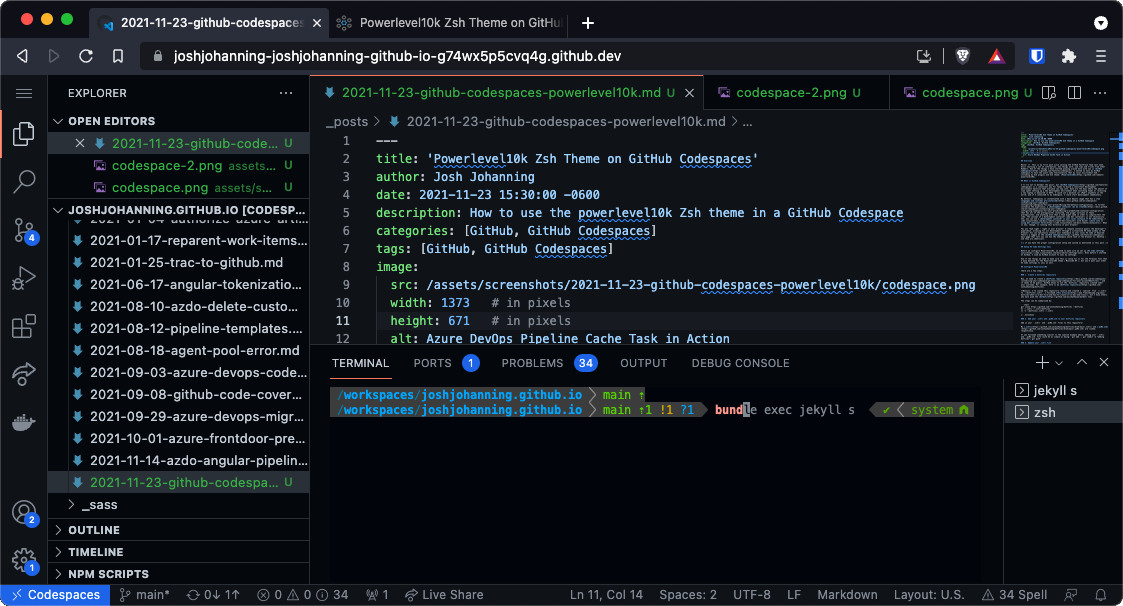 Powerlevel10k ZSH theme in GitHub Codespaces
And yes…I did write and test this blog post completely with GitHub Codespaces :).