My macOS Development Environment: iTerm2, oh-my-zsh, and VS Code
Detailing out my local macOS development environment with iTerm, oh-my-zsh with the powerlevel10k theme, VS Code, and more.
Overview
A new team member had just joined my team at GitHub and it was their first time using macOS as the primary work machine. They had asked if I had any tips on setting up your local development environment. Hint: I do! I also came from a Windows background and only first started using macOS for work in late 2019.
I was going to link them to my Powerlevel10k Zsh Theme in GitHub Codespaces, but then I realized: this is for setting up a development environment in Codespaces, not so much locally. I wrote up these instructions for my co-worker, but I thought I would re-purpose them into a blog post that I can share with others as well!
iTerm2, oh-my-zsh, and powerlevel10k theme setup
- Install iTerm2:
brew install --cask iterm2 - Install the MesloLGS fonts
- Download my iTerm profile as a json file and import into iTerm
- In iTerm, go to: Preferences > Profile, you can use the
+to import theiterm2-profile.jsonprofile - I believe the only other special things that I have in the profile (other than colors) is the ability to use
Option ⌥+←or→arrow keys to to go left / right to the end of strings,Option ⌥+Shift ⇧+←or→arrow keys to highlight entire strings, andOption ⌥+Deleteto delete entire strings
- In iTerm, go to: Preferences > Profile, you can use the
- Install oh-my-zsh (run the
curlcommand) - Install plugins like zsh-autosuggestions, zsh-syntax-highlighting (basically you clone the repo and then add the plugin to the list of
pluginsin your~/.zshrcfile - Install powerlevel10k zsh theme - basically clone the repo and modify the
~/.zshrcfile to update theZSH_THEME - You will be prompted to configure powerlevel10k - but my configuration for
~/.p10k.zshis here - My
~/.zshrcconfig is here - Make iTerm2 the default terminal: Make iTerm default terminal (
Control ^+Shift ⇧+Command ⌘+\)
That should be all you need to make your terminal look exactly like mine 😀.
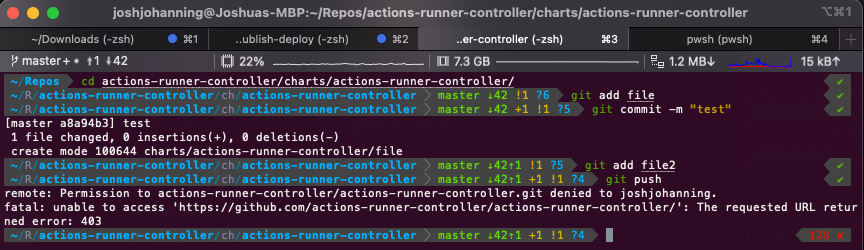 My iTerm terminal
If you’re using the powerlevel10k theme, make sure to set up the font in VS Code’s terminal as well!
You can now back up your
~/.zshrcfile and~/.p10k.zshfiles in a dotfiles repository similar to mine by creating symlinks (documentation on how to do this is in my repo also).
VS Code
Terminal Fonts
To allow VS Code’s terminal to look similar to the iTerm terminal, there are a few additional things we need. Add/modify these lines to your VS Code settings.json file by opening the command palette (Cmd ⌘/Ctrl + Shift ⇧ + P) and typing > Preferences: Open Settings (JSON):
1
2
3
4
5
{
    "terminal.integrated.shell.osx": "/bin/zsh",
    "terminal.integrated.defaultProfile.linux": "zsh",
    "terminal.integrated.fontFamily": "MesloLGS NF",
}
Now the terminal in VS Code looks nice also!
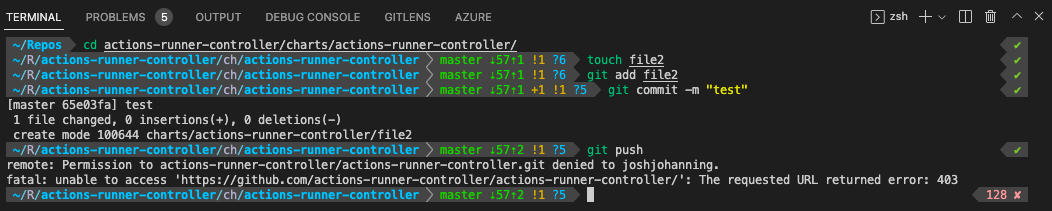 The terminal looks good in VS Code too!
Pro-tip: Turn on VS Code settings sync!
Extensions
I’ll just highlight some of my favorite extensions that I use in VS Code:
- GitHub Actions - native GitHub Actions YAML syntax and Actions workflow visualization in the IDE
- GitHub Copilot - because Copilot! 🤖
- GitHub Copilot Chat - also Copilot! 🤖 💬
- Markdown All in One - I love this because I can highlight a piece of text and paste in a link and it will automatically format the markdown for me, similar to this feature in GitHub
- GitHub Markdown Preview - a non-official GitHub extension to make the markdown preview look more like how GitHub renders markdown
- Code Spell Checker - to help me from misspelling, and as a bonus if you’re using VS Code settings sync, you can keep a custom dictionary synced across VS Code instances / Codespaces by using the “quick fix” on aka
Cmd ⌘+.on unrecognized words and “add to user settings” - YAML - for YAML syntax highlighting in the editor
- Draw.io Integration - for creating charts/architecture diagrams directly in VS Code
- GitLens - among other things, allows the ability to Git Blame view inline like you can in GitHub
- Git Graph - another option for visualizing Git branches in VS Code
- Error Lens - to tweak how errors and warnings are shown
- TODO Highlight - highlights those
TODOcomments in your code - GitHub Theme - make your VS Code look more like GitHub!
Key Bindings
Coming from Windows, my brain is wired that Ctrl + Z is undo and Ctrl + Y is redo. In macOS, undo is Cmd ⌘ + Z and redo is ⌘ + Shift ⇧ + Z. I added this key binding to allow for both Cmd ⌘ + Shift ⇧ + Z AND Cmd ⌘ + Y to be used for redo while editing in VS Code.
You can modify VS Code’s keybindings.json file by opening the command palette (Cmd ⌘/Ctrl + Shift ⇧ + P) and typing > Preferences: Open Keyboard Shortcuts (JSON):
1
2
3
4
5
6
7
8
9
10
11
12
13
14
{
    "keybindings": [
        {
            "key": "ctrl+z",
            "command": "undo",
            "when": "editorTextFocus"
        },
        {
            "key": "ctrl+shift+z",
            "command": "redo",
            "when": "editorTextFocus"
        }
    ]
}
Tabs, Spaces, and Paste Formatting
When editing GitHub Actions workflows, I would get frustrated when it would add 4 spaces for a tab vs. the customary 2 that the UI editor uses by default. Additionally, it would try to format the YAML upon pasting, which would often break the YAML. To fix this, I added the following to my VS Code settings.json file by opening the command palette (Cmd ⌘/Ctrl + Shift ⇧ + P) and typing > Preferences: Open Settings (JSON):
1
2
3
4
"[yaml]": {
    "editor.tabSize": 2,
    "editor.autoIndent": "none"
}
I set this specifically for YAML files, but you can set it for any file type by updating the header (or removing the header so that all file types use the same settings).
Colorized Bracket Pairs
I used to use Bracket Pair Colorizer 2, but this is now built-in to VS Code by adding this to your VS Code settings.json file by opening the command palette (Cmd ⌘/Ctrl + Shift ⇧ + P) and typing > Preferences: Open Settings (JSON):
1
"editor.guides.bracketPairs": true
Brew
My Brewfile of things that I have installed with Brew is here.
You can install everything in the Brewfile by running:
1
brew bundle install --file=./Brewfile
I was able to generate the Brewfile by running:
1
brew bundle dump --force
brew bundle dumpalso includes installed VS Code extensions!
App Store Apps
These are my must have App Store apps:
- Magnet ($) - for pinning windows to certain regions of the screen
- Copyclip (free) - for clipboard management
- I like to go into preferences and remember and display 2,000 clippings and start at system startup!
- Get Plain Text (free) - paste without formatting
- I set my keyboard shortcut to
Option ⌥+Cmd ⌘+vas well as launching at startup
- I set my keyboard shortcut to
- MeetingBar (free) - to show upcoming meetings in the menu bar
- Gifski (free) - for creating GIFs from videos
- Pro Mouse ($) - a better mouse cursor for presentations
- Homie (free) - for controlling HomeKit devices in the menu bar
- Bitwarden (free) - password management
- Netspot: Wifi Analyzer (free) - for scanning WiFi networks and seeing signal strength
System Settings
- Add the sound icon to the menu bar (easily switch sound outputs)
- System Settings > Control Center > Sound - Always Show in Menu Bar
Keyboard Shortcuts
General Keyboard Shortcuts
These are helpful, out of the box keyboard shortcuts that I often use:
| Action | Shortcut |
|---|---|
| Hide the windows of the front app | Cmd ⌘ + h |
| Minimize the front window to the dock | Cmd ⌘ + m |
| Hide all but current app | Option ⌥ + Cmd ⌘ + h |
| Use the app in full screen / exit full screen | Control ^ + Cmd ⌘ + f |
| Maximize an app (not full screen) / put back | Option ⌥ + click maximize button |
| Find again (when using Cmd ⌘ f) | Cmd ⌘ + g |
| Quit app | Cmd ⌘ + q |
| Force quit an app | Option ⌥ + Cmd ⌘ + esc |
| Screenshot the entire screen | Cmd ⌘ + Shift ⇧ + 3 |
| Screenshot a selection using a picker | Cmd ⌘ + Shift ⇧ + 4 |
| Screenshot or record a selection | Cmd ⌘ + Shift ⇧ + 5 |
| Screenshot the touch bar (RIP) | Cmd ⌘ + Shift ⇧ + 6 |
| Screenshot entire window | Space bar when in screenshot mode |
| Switch between open apps | Cmd ⌘ + tab |
| Switch between multiple windows of app | Cmd ⌘ + ` (backtick key) |
| Quit app when switching between apps | When in the Cmd ⌘ + tab interface, press q |
| See all apps | F3 (may need fn + F3) |
| See desktop | Cmd ⌘ + F3 (may need fn + Cmd ⌘ + F3) |
| Switch between desktops/maximized apps | Control ^ + ← or → arrow keys |
| Spotlight Search | Cmd ⌘ + Space bar |
| Re-order menu bar icons | Hold Cmd ⌘ and drag |
| Refresh page (in browser) | Cmd ⌘ + r |
| View history (in browser) | Cmd ⌘ + y |
Finder Keyboard Shortcuts
| Action | Shortcut |
|---|---|
| Delete a file | Cmd ⌘ + delete |
| Rename a file | return |
| Show/hide hidden files | Cmd ⌘ + Shift ⇧ + . |
| Cut (move) file | Copy normally, then Option ⌥ + Cmd ⌘ + v |
| Open a file / folder | Cmd ⌘ + o or Cmd ⌘ + ↓ arrow key |
| Enter folder | Cmd ⌘ + ↓ arrow key |
| Leave folder | Cmd ⌘ + ↑ arrow key |
| Rename file/folder | return |
Text Editing Keyboard Shortcuts
| Action | Shortcut |
|---|---|
| Delete whole line | Cmd ⌘ + delete |
| Delete just the last word | Option ⌥ + delete |
| Go to the beginning of the line | Control ^ + a |
| Go to the end of the line | Control ^ + e |
| Highlight just one word | Shift ⇧ + Option ⌥ + ← or → arrow keys |
| Highlight the entire line | Shift ⇧ + Cmd ⌘ + ← or → arrow keys |
| Jump to bottom of document | Cmd ⌘ + ↓ arrow key |
| Jump to top of document | Cmd ⌘ + ↑ arrow key |
| Highlight text vertically | Shift ⇧ + Option ⌥ + select with mouse |
Other Tips
- Open a new Finder window from the current directory in Terminal:
open . - Update the modified time of a file:
touch -mt202303261924 ./file-to-update.xyz - Terminate all instances of a process:
killall Finder(case sensitive) - Open file in application: drag the file over the app (e.g. VS Code) in the dock to open
- Output the URL and title of each tab in all open Chrome windows:
1
  osascript -e{'set o to""','tell app"google chrome"','repeat with t in tabs of windows','set o to o&url of t&" "&title of t&linefeed',end,end}|sed \$d
Troubleshooting
Question: I’m seeing special characters that aren’t rendering in my terminal?
Answer: Make sure you install the MesloLGS fonts and configure it to be used in iTerm and VS Code. Powerlevel10k uses custom glyphs from the font to render the terminal correctly.
Summary
Before writing this post, I had most of this in OneNote of what to do when I get a new Mac. Most things are automated, but some like the App Store Apps I install, are not. I plan on sharing this with folks who ask how to get started quickly on a new Mac!
Let me know anything I missed or improvements I can make here, or tips for anyone else coming over from the Windows world 🙏