Migrate SVN to Git
Migrate SVN to Git using either the import repository feature in GitHub or git-svn
Overview
Let’s face it: Subversion had its time in the sun, but Git is the more modern source control system. If you want to use GitHub and take advantage of all the collaboration and security features, you’re going to want your source code in GitHub. In this post, I describe several options on how to make the jump to Git and GitHub and bring your code (including history!) with you.
GitHub Importer
Probably the easiest (and yet the least likely you’ll be able to use) is the GitHub Repo Importer (you can use this for SVN, Mercurial, TFVC, and of course, Git). When you create a new repository in GitHub, there is a little blue link that allows you to Import a repository. If you forget to click the link to import a repository at the time you are creating and naming your GitHub repo, you can still import after repo creation if you haven’t initialized the repository with a Readme or .gitignore.
The reason why I say least likely to be able to use is that this requires your SVN server to be publicly accessible from GitHub.com. Most Subversion servers I run into our hosted on-premises, which means you’re pretty much out of luck.
If this does work for you, provide the repository url, credentials, and if applicable, which project you are importing, and away you go.
Note: According to the documentation, the GitHub Repository Importer is not a feature in GitHub Enterprise Server yet.
git-svn
This is the tool I have the most experience with. Using git svn commands, you can create a Git repo from a repo hosted in Subversion (history included). The larger the repo is and the more history there is, the longer the migration will take. Once the repo has been migrated, it can be pushed to GitHub, Azure DevOps, or any other Git host.
See the official documentation for migrating from SVN to Git with the git svn commands.
The high-level process is as follows:
- Extract the authors from the SVN repo to create an
authors.txtmapping file - Modify the mapping file with the author names and email addresses
- Run
git svn clonecommand - Clean up tags and branches
- Create a Git repo in GitHub / Azure Repos
- Add the Git repo remote to the local repo and push
System Pre-Reqs
- Windows:
- Git for Windows
- TortoiseSVN - When installing, check the box to install the ‘command line client tools’ (not checked by default). Modify or uninstall/re-install if you did not do this with your initial installation. This allows you to run the
svncommands from the command line
- macOS Catalina, Big Sur, Monterey, and greater:
- Run this command to install the
git,svn, andgit svncommands:xcode-select --install gitshould already be installed, so alternatively you can just installsvnwith the correspondingbrewformulae:brew install subversion- You can also ensure you have the latest version of
git:brew install gitorbrew upgrade git
- You can also ensure you have the latest version of
- Run this command to install the
Option 1: Tags as Branches
These commands clone an SVN repository to Git, perform some cleanup, and push it to your Git host of choice. Branches will appear as /origin/<branch-name>. In GitHub/Azure DevOps, you can clean this up by re-creating the branch at the root, e.g., creating a new branch /<branch-name> based on /origin/<branch-name>. You can confirm the commit hashes are the same and then delete the branch under /origin. You can delete /origin/trunk without re-creating it because trunk should have been re-created as master.
Tags will appear as branches, e.g.: /origin/tags/<tag-name>. You can clean this up by re-creating the tag branch at the root, e.g. /tags/<tag-name> or /<tag-name>. Otherwise, you can manually create a tag in the tags page in GitHub/Azure DevOps based off of the /origin/tags/<tag-name> branch reference. Branches and tags are just pointers in Git anyway, so whether it appears as a tag or a branch, the referenced commit SHA will be the same.
Note: In GitHub, when you create a release, you must specify a tag. So, creating a release in the web interface will create a tag. Otherwise, you can use the command line to create tags.
Get a list of the committers in an SVN repo:
1
 svn log -q http://svn.mysvnserver.com/svn/MyRepo | awk -F '|' '/^r/ {sub("^ ", "", $2); sub(" $", "", $2); print $2" = "$2" <"$2">"}' | sort -u > authors-transform.txt
- Modify each line to map the SVN username to the Git username, e.g.:
josh = Josh <josh@example.com>- Make sure the file is encoded as UTF-8
Clone an SVN repo to Git:
1
 git svn clone http://svn.mysvnserver.com/svn/MyRepo --authors-file=authors-transform.txt --trunk=trunk --branches=branches/* --tags=tags MyRepo
Note: In case of a non-standard layout, replace
trunk,branches, andtagswith appropriate namesGit Tags cleanup (creating local tags off of the
remotes/tags/<tag-name>reference so that we can push them):1
git for-each-ref refs/remotes/tags | cut -d / -f 4- | grep -v @ | while read tagname; do git tag "$tagname" "tags/$tagname"; git branch -r -d "tags/$tagname"; done
Git Branches cleanup (creating local branches off of the
remotes/<branch-name>reference so that we can push them):1
git for-each-ref refs/remotes | cut -d / -f 3- | grep -v @ | while read branchname; do git branch "$branchname" "refs/remotes/$branchname"; git branch -r -d "$branchname"; done
Add the remote:
1
 git remote add origin https://github.com/<user-or-org>/<repo-name>.git
Push the local repo to Git host:
1
 git push -u origin --all
This is what you can expect tags to look like in GitHub after running the migration (as branches): 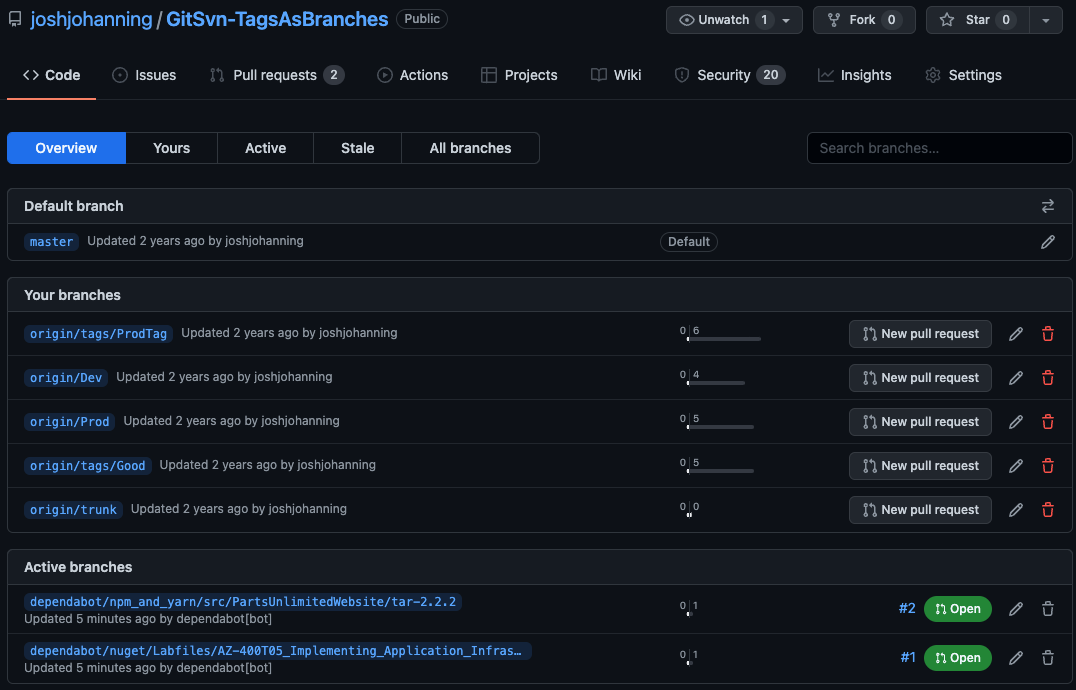 How tags appear in GitHub (as branches) - You can even see that Dependabot created a few branches!
And in Azure DevOps: 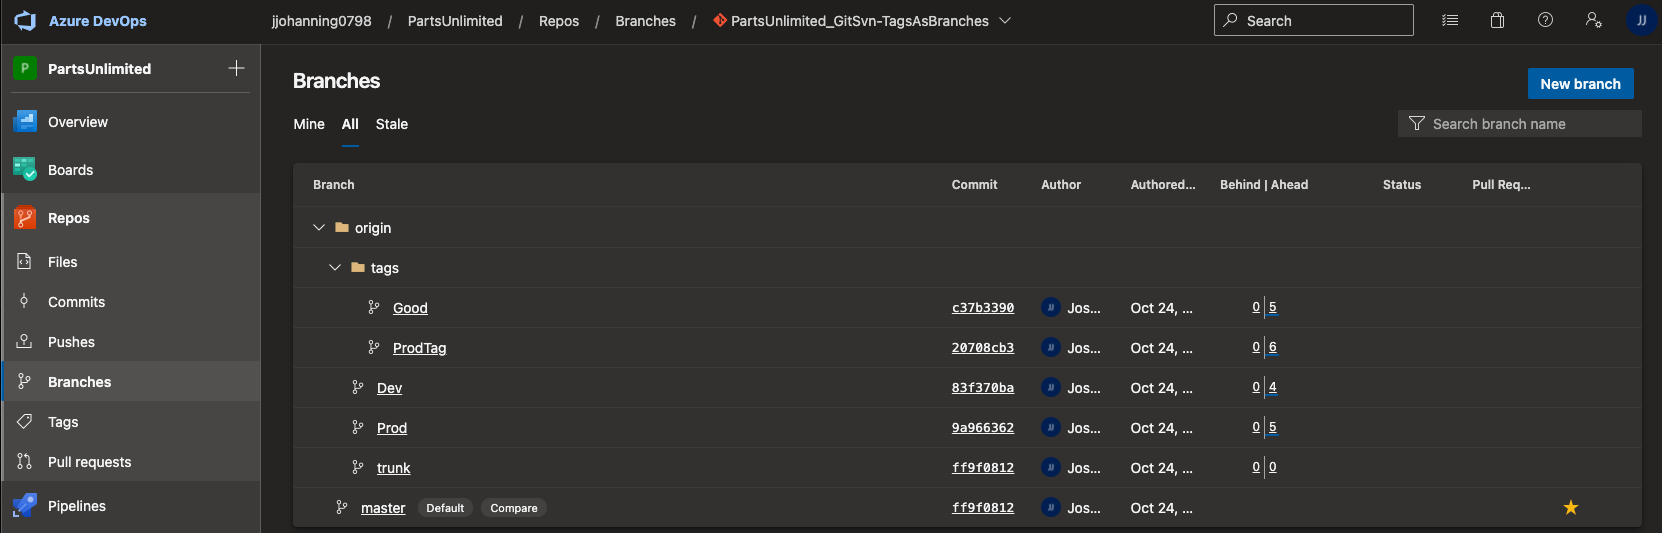 How tags appear in Azure DevOps (as branches)
Option 2: Tags as Tags
When following the above instructions, tags will appear as a branch /origin/tags/<tag-name>. This is usually fine since branches and tags are just pointers in Git anyway, so whether it appears as a tag or a branch, the referenced commit SHA will be the same.
If you want to see the tags show under the tags page instead of the branches page in GitHub/Azure DevOps, you can manually create a new tag based on the branch in /origin/tags/, or follow the alternative commands below (particularly step #4).
Note: In GitHub, when you create a release, you must specify a tag. So, creating a release in the web interface will create a tag. Otherwise, you can use the command line to create tags.
Get a list of the committers in an SVN repo:
1
 svn log -q http://svn.mysvnserver.com/svn/MyRepo | awk -F '|' '/^r/ {sub("^ ", "", $2); sub(" $", "", $2); print $2" = "$2" <"$2">"}' | sort -u > authors-transform.txt
- Modify each line to map the SVN username to the Git username, e.g.:
josh = Josh <josh@example.com>- Make sure the file is encoded as UTF-8
Clone an SVN repo to Git:
1
 git svn clone http://svn.mysvnserver.com/svn/MyRepo --authors-file=authors-transform.txt --trunk=trunk --branches=branches/* --tags=tags MyRepo
Note: In case of a non-standard layout, replace
trunk,branches, andtagswith appropriate namesCreate Git Tags based on the message that was originally in SVN.
1
2
3
4
5
6
7
8
9
 git for-each-ref --format="%(refname:short) %(objectname)" refs/remotes/origin/tags \
 | while read BRANCH REF
   do
         TAG_NAME=${BRANCH#*/}
         BODY="$(git log -1 --format=format:%B $REF)"
 echo "ref=$REF parent=$(git rev-parse $REF^) tagname=$TAG_NAME body=$BODY" >&2
 git tag -a -m "$BODY" $TAG_NAME $REF^  &&\
         git branch -r -d $BRANCH
   done
Git Branches cleanup (creating local branches off of the
remotes/<branch-name>reference so that we can push them):1
git for-each-ref refs/remotes | cut -d / -f 3- | grep -v @ | while read branchname; do git branch "$branchname" "refs/remotes/$branchname"; git branch -r -d "$branchname"; done
Add the remote:
1
 git remote add origin https://github.com/<user-or-org>/<repo-name>.git
Push the local repo to Git host:
1
 git push -u origin –all
Push the tags to Git host:
1
 git push --tags
This is what you can expect tags to look like in GitHub after running the migration (as tags): 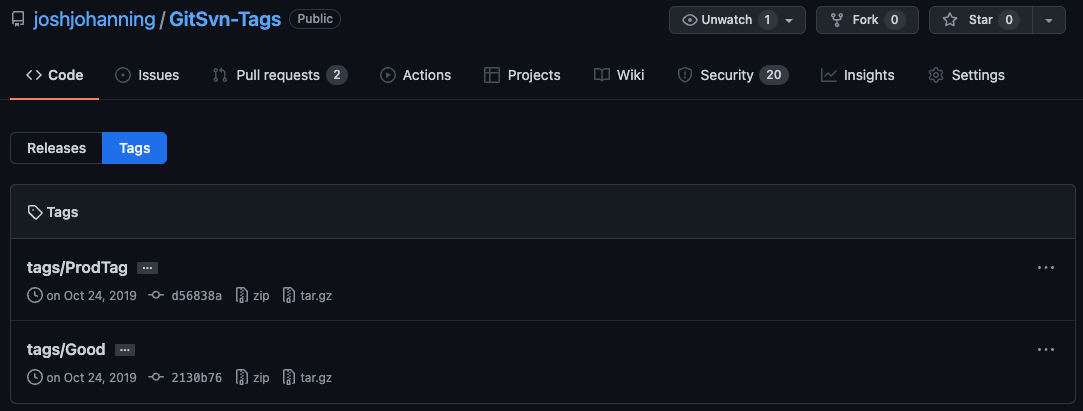 How tags appear in GitHub (as tags)
And in Azure DevOps: 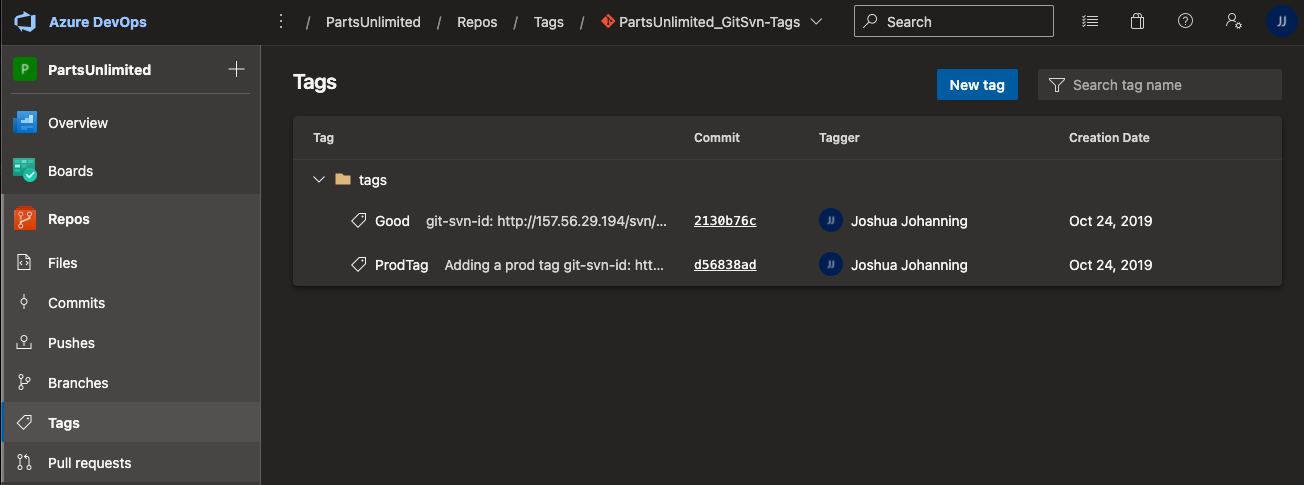 How tags appear in Azure DevOps (as tags)
Clone partial history from SVN
This can be useful if you only want/need history from the last X months or last N revisions cloned from the SVN repository. This can help to speed up the conversion as well as potentially bypassing any errors (such as server timeout). You must pick/find what revision you want to start with manually, though. In this example I am getting everything from revision 3000 to current (HEAD):
1
git svn clone -r3000:HEAD http://svn.mysvnserver.com/svn/MyRepo --authors-file=authors-transform.txt --trunk=trunk --branches=branches/* --tags=tags MyRepo
You can use an SVN client (TortoiseSVN on Windows, SmartSVN on Mac) or git svn log to help you with finding out what revision to start with. Alternatively, if you want to precisely find the previous N revision, you can use the 3rd party scripts found here.
Metadata
The --no-metadata option can be used in the git svn command (steps #3 above) for one-shot imports, like we are essentially what we are doing here, but it won’t include the git-svn-id (url) in the new git commit message. If this is a one-shot import, and you don’t want to be cluttered with the old git-svn-id (url), include this option.
From the git-svn documentation:
Set the
noMetadataoption in the [svn-remote] config. This option is not recommended.This gets rid of the
git-svn-id: lines at the end of every commit.This option can only be used for one-shot imports as
git svnwill not be able to fetch again without metadata. Additionally, if you lose your$GIT_DIR/svn/**/.rev_map.*files,git svnwill not be able to rebuild them.
You can compare the difference between adding --no-metadata and not in the examples of my migration runs:
- Tags as Branches (with
--no-metadata) - Tags as Tags (without
--no-metadata)
Note that my initial commit in SVN didn’t have a commit message, that’s why it’s showing “No commit message” for most of the files. git svn migrates commit messages with or without --no-metadata.
Resources / Bookmarks
This is my stash of references I used that may be helpful for you:
- Converting a Subversion repository to Git and cleaning up binaries in the process
- tortoise svn giving me “Redirect cycle detected for URL ‘domain/svn’”
- Why do I get “svn: E120106: ra_serf: The server sent a truncated HTTP response body” error?
- How to import svn branches and tags into git-svn? and convert git-svn tag branches to real tags
- What is the format of an authors file for git svn, specifically for special characters like backslash or underscore?
- Git svn clone with author name like “/CN=myname”
- Author not defined when importing SVN repository into Git (make sure the file is encoded as UTF-8)
- git svn –ignore-paths regex, and How is ignore-paths evaluated in git svn?
- SVN and KeepAlive (svn: E175002: Connection reset)
- How to git-svn clone the last n revisions from a Subversion repository? and Git Svn clone certain revision, and continue cloning other revisions in the future
svn2git
GitHub’s importing source code to GitHub documentation mentions another tool you can use as well - svn2git. I do not have any experience with this tool but wanted to call it out here as another option.
Tip Migration
I’d be remiss if I did not mention that there’s always the option of just migrating the tip - meaning, grab the latest code from SVN and start fresh with a new repo in GitHub. Leave all of the history in SVN and start fresh in GitHub by coping in the files, creating a gitignore to exclude any binaries and other unwanted files, and pushing. Ideally, you could keep the SVN server around for a while or make an archive somewhere that it would still be possible to view / recover the history.
Understandably, this won’t work for everyone, but it is always an option if the migration options aren’t worth the effort, and you really just care about your most recent code being in GitHub.
Wrap-up
Now that you have your code migrated to Git, the hard part of moving to GitHub is behind you. Even if you’re not using GitHub, migrating from SVN to Git certainly has its advantages.
I will note that once the code is in GitHub, it is technically possible to use svn clients to connect to repositories on GitHub, if you’re in GitHub I think it is wise to use Git like everyone else in GitHub :).
Did I miss anything, or have you any improvements to be made? Let me know in the comments!