How to Sign Commits for GitHub
Signing commits locally to show up as verified commits in GitHub
Overview
This post will cover how to sign commits locally so that they show up as verified in GitHub. This can be important because in GitHub (as well as other Git platforms), it uses the email in your local git config to match the commit author to the username. Therefore, it’s possible to spoof commits by changing the email to someone else’s in your local git config. Signing your commits will ensure that the commits are coming from the correct user and that they haven’t been spoofed.
If you’re editing via the web, the commits will already show up as Verified since the UI of course knows about your identity already. However, when you make commits locally, they won’t show up as Verified by default without signing them.
There are a couple of ways to sign commits:
- Use a GPG key
- Use an SSH key (if you already use the SSH protocol to connect to GitHub, add the same key as a signing key in GitHub)
- Use an S/MIME x.509 certificate issued by your organization
This tutorial will cover the first two option: using a GPG key and using an SSH key. Regardless of which option you choose, all signing options can be used for both HTTPS and SSH git protocols. GPG keys allow for an expiration date to be set when created whereas SSH keys do not.
See my co-worker Ken Muse’s post for more advanced and considerations for the various commit signing options.
Using a GPG Key
- Generate GPG key locally (ie: run in git bash if in windows):
gpg --full-generate-key- You can accept the defaults (use enter) for type of key, elliptic curve, and expiration - you will have to type
yto confirm - Enter your name for the Real name field
- Enter your email
- Important: The EMAIL field should be the primary email on the on the user’s GitHub account
- If you keep your primary email private, use the
@users.noreply.github.comemail address shown to you in your email settings page
- Comment is optional
- Confirm the information by typing
Oand then enter - As a best practice, add a passphrase to the GPG key when prompted
- You can accept the defaults (use enter) for type of key, elliptic curve, and expiration - you will have to type
- List the keys:
gpg --list-secret-keys --keyid-format=long- For example, this returns a string like
rsa3072/1BB5F381EEE9CC5A,1BB5F381EEE9CC5Ais the value you are looking for (the value after the<key type>/) - this is the GPG key ID
- For example, this returns a string like
- Add the GPG key ID to your local git config:
git config --global user.signingkey 1BB5F381EEE9CC5A - Retrieve the entire public key using the GPG key ID:
gpg --armor --export 1BB5F381EEE9CC5A- On macOS, you can add
| pbcopyto copy the result to clipboard
- On macOS, you can add
- Add the public GPG key to your GitHub profile under the GPG keys section
- . If you have used an alternative method to sign commits (like SSH), run this to set GPG back to the default:
git config --global --unset gpg.format
- Sign your commits:
- Add this to your git config to sign all new commits:
git config --global commit.gpgsign true - Otherwise, sign the commit manually when committing:
git commit -S -m "commit message"
- Add this to your git config to sign all new commits:
- When committing, you should be prompted for the key’s passphrase (if you added one in step #1 above)
- After you push, you should see the verified tag on your commit in GitHub
- You can click on the verified tag to see the GPG key that was used to sign the commit (same in step #2 above)
Note: In macOS, I received an error when committing (“gpg: signing failed: Inappropriate ioctl for device”) until I ran:
export GPG_TTY=$TTY. It is recommended to add this to the top of your shell profile (ie:~/.bash_profileor~/.zshrc)
Note: In WSL, I was working with someone who received an error when committing (“error: gpg failed to sign the data, fatal: failed to write commit object”) until I ran:
export GPG_TTY=$(tty). It is recommended to add this to the top of your shell profile (ie:~/.bash_profileor~/.zshrc)
Using an SSH Key
- If you don’t already have one, generate an SSH key:
ssh-keygen -t ed25519 -C "your_email@example.com"- As a best practice, add a passphrase to the SSH key when prompted
- Add the key to your local git config:
git config --global user.signingkey ~/.ssh/id_ed25519.pub - Tell git to use the SSH key instead of GPG:
git config --global gpg.format ssh - Display the public key:
cat ~/.ssh/id_ed25519.pub - Copy and paste to add the public SSH key to your GitHub profile under the SSH keys section - add it as an SSH signing key
- Optionally, add this to your local git config to sign every commit you create:
git config --global commit.gpgsign true- Otherwise, sign the commit manually when committing:
git commit -S -m "commit message"
- Otherwise, sign the commit manually when committing:
- When committing, you should be prompted for the key’s passphrase (if you added one in step #1 above)
- After you push, you should see the verified tag on your commit in GitHub
- You can click on the verified tag to see the fingerprint of the SSH key that was used to sign the commit
Summary
It’s relatively easy to sign commits, so there really isn’t an excuse to not do so! 🔐 ✅
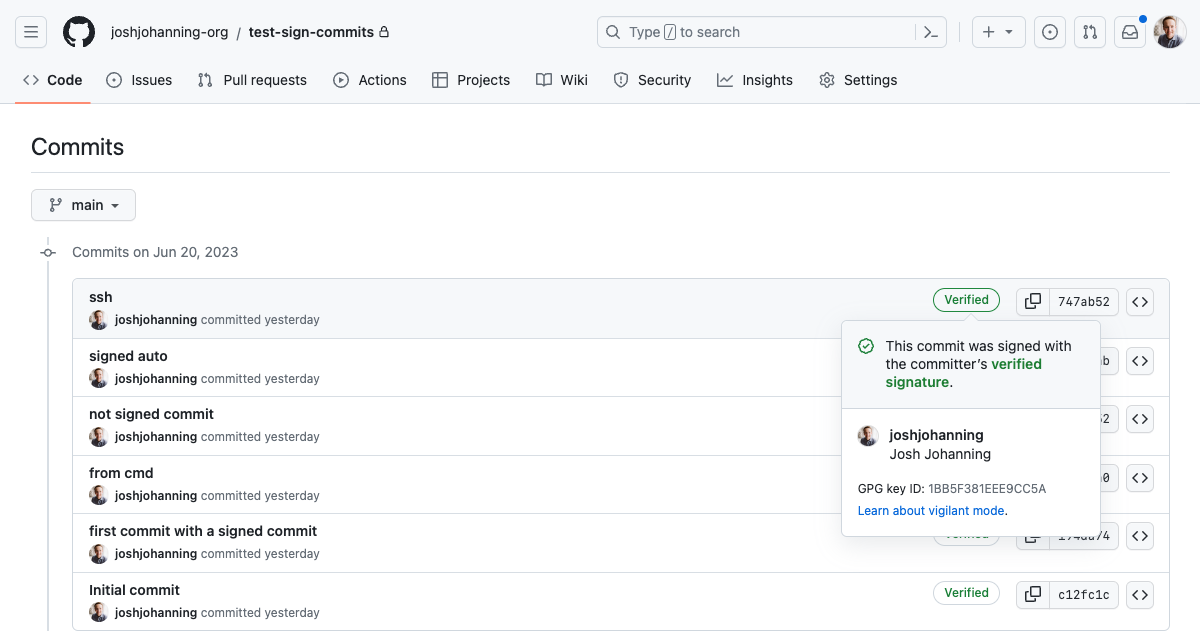
 Example of a verified commit in GitHub