Tokenizing Angular Environment Configuration in Azure DevOps
Using the 'build once deploy many' concepts with an Angular application and Azure Pipelines
Overview
I was working with a team that had an Angular front-end application and I was tasked with improving their CI/CD process. They had some automated pipelines, but they were running a build before each environment by running a different npm run build -- --prod --configuration <env> command.
My co-worker Colin Dembovsky summarizes it well in a similar post for .NET Core:
The Build Once Principle
If you’ve ever read any of my blogs you’ll know I’m a proponent of the “build once” principle. That is, your build should be taking source code and (after testing and code analysis etc.) producing a single package that can be deployed to multiple environments. The biggest challenge with a “build once” approach is that it’s non-trivial to manage configuration. If you’re building a single package, how do you deploy it to multiple environments when the configuration is different on those environments?
Basically, if you’re running a new build for each environment, you might as well not do any tests after your Dev build because there’s no way you can guarantee that the binaries build for Dev are the same as the ones going into Production. Never mind that it’s inefficient and wastes time - you already compiled your code once, why do it again? The only things that should differ between environments should be the environment-specific configuration (such as a connection string, or in my case, the back-end API url).
I’m taking the concepts from that post and my experience with a few other clients and will be doing something very similar to that here!
The Problem
The particular challenge with Angular is that the build output is not the same file name every time - you can’t just swap in a new file with the proper values. See screenshot for th main.js files from two builds:
 Compiled main.js output from two different builds
Solution and File Edits
We are going to make a few modifications and additions to the Angular code, but most of the changes will come in the pipeline.
Pre-requisites:
- Qetza’s Replace Tokens extension installed in the Azure DevOps organization
angular.json
Your angular.json file might look a little different, but what I did was take an existing configuration, copy/paste it, and change the fileReplacements section, specifically the src/environments/environment.tokenized.ts line.
1
2
3
4
5
6
7
8
9
10
11
12
13
14
15
16
17
18
19
20
21
22
23
24
25
26
27
28
          "configurations": {
            ...
            "tokenized": {
              "fileReplacements": [{
                "replace": "src/environments/environment.ts",
                "with": "src/environments/environment.tokenized.ts"
              }],
              "optimization": true,
              "outputHashing": "all",
              "sourceMap": false,
              "namedChunks": false,
              "extractLicenses": true,
              "vendorChunk": false,
              "buildOptimizer": true,
              "budgets": [{
                  "type": "initial",
                  "maximumWarning": "2mb",
                  "maximumError": "4mb"
                },
                {
                  "type": "anyComponentStyle",
                  "maximumWarning": "100kb",
                  "maximumError": "150kb"
                }
              ]
            }
          }
        }
environments.tokenized.ts
Similarly, I copied an existing src/environments/environments.*.ts file to create the environments.tokenized.ts file that my new configuration will use. The important line here is the baseUrl: '#{baseUrl}#' line. Notice how I’m creating a token here with the #{token-name}# syntax. This is the syntax of the token that our deployment process will know to find and replace.
1
2
3
4
5
6
7
8
import { NgxLoggerLevel } from 'ngx-logger';

export const environment = {
  production: true,
  baseUrl: '#{baseUrl}#',
  webUrl: location.origin,
  loggerLevel: NgxLoggerLevel.OFF
};
azure-pipelines.yml
Finally, we just need to modify our pipeline file! I’ll break down the changes in chunks.
1. NPM Build
In the Build job, update the NPM build command. In this example, the command this task will produce will be npm run build -- --prod --configuration=tokenized. Alternatively, you may just opt to use a script task, but the Npm@1 task also works.
1
2
3
4
5
6
7
- task: Npm@1
  displayName: "npm build"
  inputs:
    command: custom
    workingDir: src
    verbose: false
    customCommand: run build -- --configuration=tokenized
2. Add Variables for your Tokens
For each token you have, add a like-named variable. The task uses the variable name/value to find/replace in the tokenized file. Here’s an example of setting a variable at the stage level (ie: Deploy to Dev), but the variable could also be scoped at the job level. Just note that the variable is created without the #{ prefix or }# suffix - in other words, just create the variable as the token name without the wrappings.
1
2
3
4
- stage: deployDev
  displayName: "Deploy Dev"
  variables:
    baseUrl: https://mysite-dev.azurewebsites.net/
3. Extract Files
I’m assuming your build artifacts are published to the Pipeline, which is going to create a zip. In the Deployment job, we need to unzip the artifact before we can inject the real values in place of the tokens.
1
2
3
4
5
- task: ExtractFiles@1
  displayName: 'Extract files'
  inputs:
    archiveFilePatterns: '$(pipeline.workspace)/**/*.zip'
    destinationFolder: '$(Pipeline.Workspace)/deploy'
- Unzip Note 1: If you are running on your own ubuntu agents, make sure
unzipis installed first! - Unzip Note 2: Similarly, if you are running on your own agents, the above example requires the workspace to be cleaned for each run otherwise on the second run it will find more than one
.zipfile to extract. You could alternatively use a stronger typed pattern than the**/*.zippattern in finding your zips, of course.
4. Replace Tokens
Right after you extract the contents of the artifact zip, add in the Replace Tokens task. Note how my rootDirectory parameter is the same as the destinationFolder parameter from the unzip task. Additionally, targetFiles parameter is using a pattern to find the main*.js file, no matter what the file gets named for each build.
1
2
3
4
5
6
7
- task: qetza.replacetokens.replacetokens-task.replacetokens@3
  displayName: 'Replace tokens'
  inputs:
    rootDirectory: '$(pipeline.workspace)/deploy'
    targetFiles: '**/main*.js'
    escapeType: none
    verbosity: detailed
- Replace Tokens Note 1: Normally I don’t use the full name when referencing pipeline tasks, but if you also have Colin’s ALM Corner Build and Release Tools, you’ll run into an ambiguous task name error.
- Replace Tokens Note 2: If you opted to not use the default token prefix/suffix like
#{token-name}#, you can add in thetokenPrefixandtokenSuffixparameters here as well. Further documentation is here. - Replace Tokens Note 3: If you had tokens in other
.jsfiles, you could simply use a**/*.jspattern.
5. Azure Web App Deploy
Assuming your deploying this Web App to Azure, update your task to use the new folder location instead of the zip package. The input takes either a zip or a folder, so we could have zipped our folder back up after running the replace tokens task, but there is no need. We simply need to use the same path for package that we used above for destinationFolder and rootDirectory.
1
2
3
4
5
6
7
- task: AzureWebApp@1
  displayName: 'Deploy Azure Web App'
  inputs:
    azureSubscription: MyAzureSubscription
    appType: 'webAppLinux'
    appName: WebAppName
    package: '$(Pipeline.Workspace)/deploy'
Summary
The build job will use our tokenized configuration to run the build and use our #{baseUrl}# token to use when compiling instead of a Dev or Prod URL. When you build locally, you can still use whatever other configuration you want without having to worry about the tokenized value. Just be sure to keep your config in sync, that is if you add or change something to one environment*.ts file, make sure to remember to do the tokenized one as well.
The deployment job will…
- take your published artifact zip from build
- extract it
- use the variable with the same name as the token to inject the value in for the right deployment environment
- deploy your web app like normal!
- rinse and repeat for all of your environments
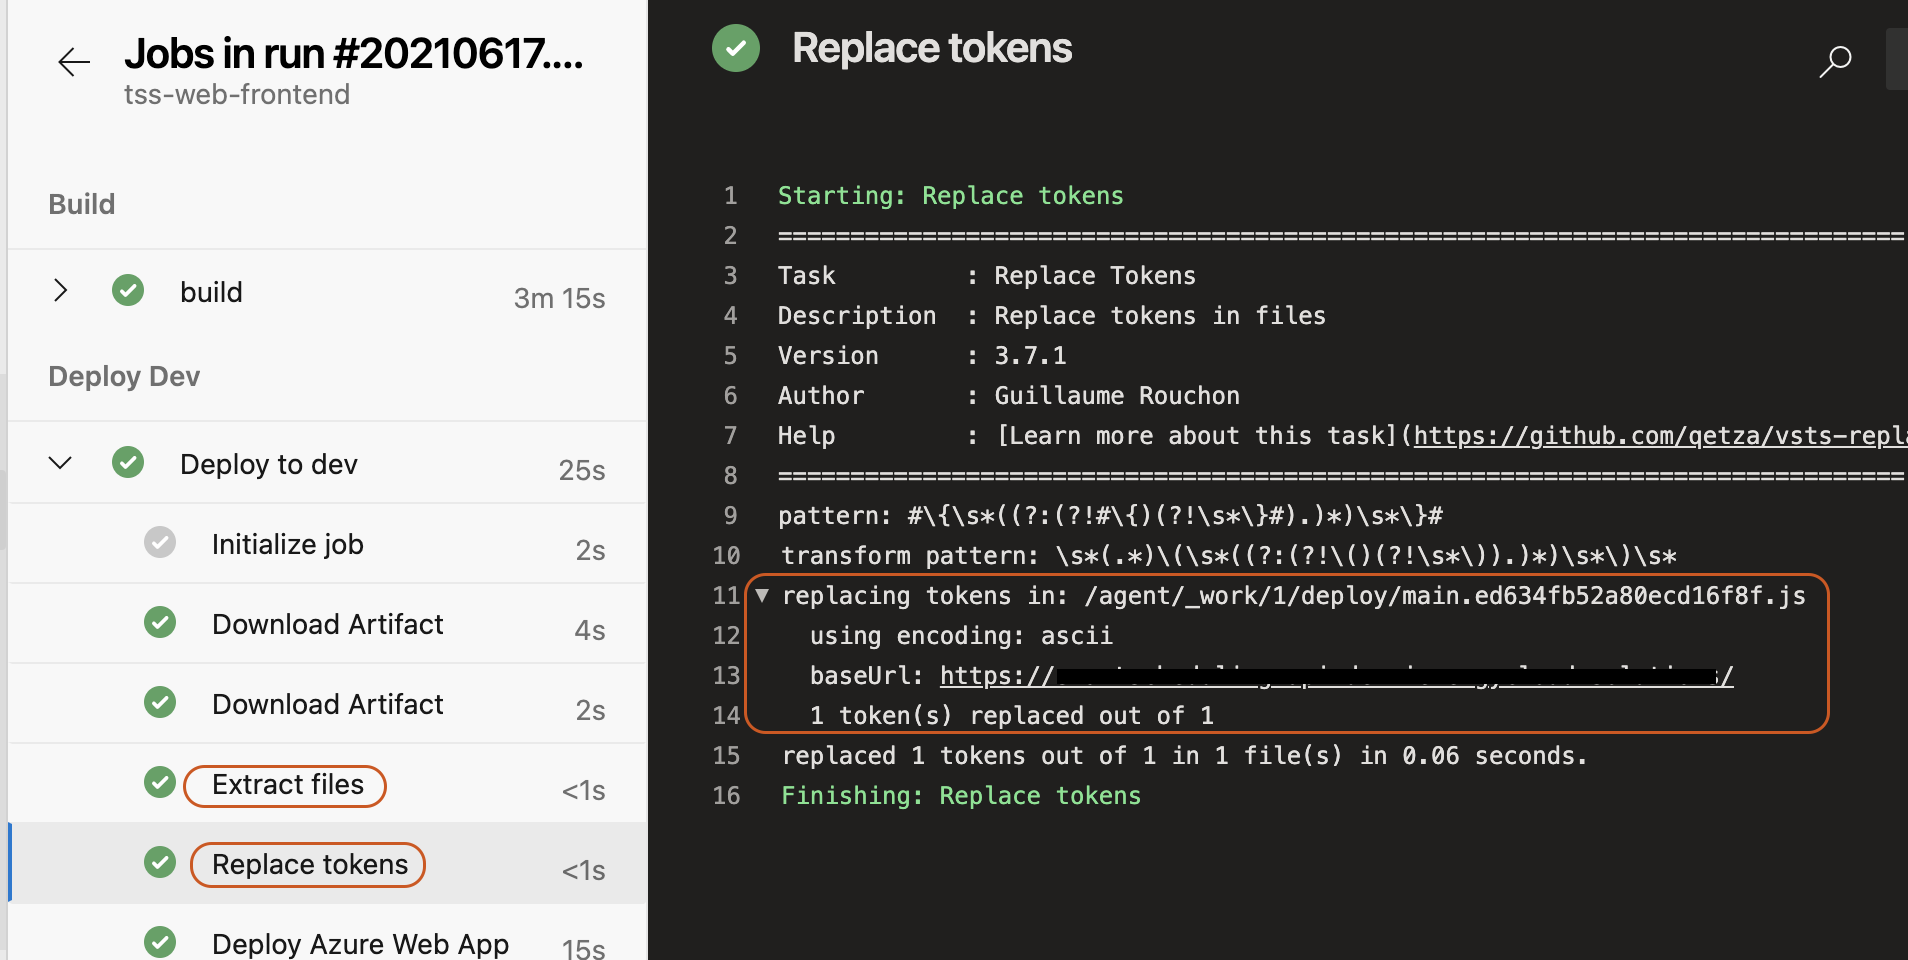 Replace Tokens output in the pipeline
Build Configuration / File Replacement Update 08/12/2021
I saw this in an angular.json file and had to update this post. This might be a more elegant solution than creating an entirely new tokenized build configuration:
1
2
3
4
5
6
7
8
9
10
11
          "configurations": {
            "production": {
              "fileReplacements": [
                {
                  "replace": "apps/My-Angular-App/src/environments/environment.ts",
                  "with": "apps/My-Angular-App/src/environments/environment.prod.ts"
                }
              ],
              ...
            }
          }
This encapsulates the best of both worlds - we are still building once and deploying many, but we also don’t need a specialized build configuration to run through. We can use the normal production build configuration and file replace the tokenized environments.prod.ts with environment.ts at build time.
The deployment replace tokens task will replace the tokens with the proper environment-specific variable configuration.