Azure DevOps: Migrate Work Items to New Organization / Project
Migrating work items to a different project or organization in Azure DevOps isn't as easy it should be. There are various ways to do so, with various levels of complexity and various levels of fidelity (history, for example).
Overview
If you have used Azure DevOps for a long time, you probably have asked / been asked if you can just simply move work items in one project to another. Maybe there was a company re-org, or the work was created in a ‘temporary’ project and needs a final resting spot, or you’re migrating to a new Azure DevOps organization for whatever reason. If you are vaguely aware of the tool, you’ll know that this can sometimes be easier said than done, especially if you want a migration with any level of fidelity. Not to say a full-fidelity migration is the end-all-be-all - sometimes the ask can be solved with considerably less effort if one was to just import the work items into the new project and if history is needed, simply refer to the old project. In like 3 weeks, the history will be meaningless anyways. In this post, I want to detail some options that you have as well as some caveats and gotchas.
I want to highlight at a high level the options:
| Scenario | Consideration | Option(s) |
|---|---|---|
| Moving work items to a project within the same organization | Full fidelity | Native ‘move work item’ tool in Azure DevOps |
| Moving work items to a project in a different organization | Not full fidelity - just need the work items | Excel integration using Office Integration Tools (Windows-only) or CSV Import/Export (cross-platform) |
| Moving work items to a project in a different organization | Full fidelity | nkdAgility/azure-devops-migration-tools or microsoft/vsts-work-item-migrator |
Moving work items to a project within the same organization
Lucky you, this is the easiest. In the April 13 2016 sprint update (that didn’t make it to Azure DevOps Server until 2019!!), the Azure DevOps team added the ability to move a work item between projects within the same organization. As quoted from the sprint note:
Users may now move a work item(s) between team projects. The work item ID remains the same and all of the work item’s revisions are moved. Users may also change type during a move and add a comment to be included as part of the work item’s discussion section.
You can either move a single work item from the ellipses and selecting the Move to Team Project option. This pops up the work item in the new project and prompts you to fix any area / iteration path validation errors before saving.
You can additionally write a query for the work items you want to migrate and multi-select (using ctrl-a, ctrl-click, ctrl-shift-click, etc.), right click, and select Move to Team Project…. From there, you will be brought to a page
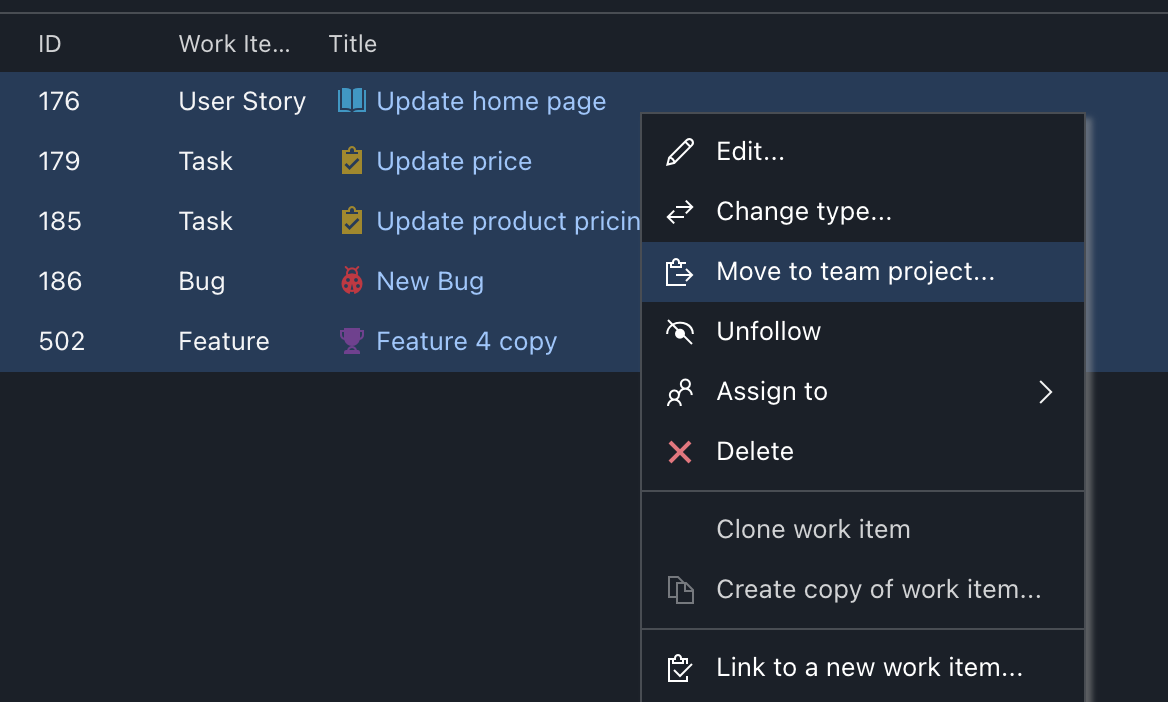 Migrating multiple work items to a new project
This method moves the work item in whole, preserving the original work item ID and history. If you move parent/child items (i.e.: Feature/User Story), these relationships are preserved as well. You even have the option to convert the items being moved to the new team project to a different work item type.
There is more documentation of this feature on this page.
Moving work items to a project to a different organization - no fidelity but easier
When moving work items to a different organization, the task becomes a little harder. The easiest of the options is to use the Excel Office Integration Tools plugin (Windows-only) or CSV Import/Export (cross-platform). It’s relatively simple, but still a little more complex than just moving work items to a new project in the UI.
There are two sub-options here, but both will require a query to be created.
Assuming you want child/parent relationships migrated, create a tree query that includes all of the columns of data that you want to export. Here is an example list of columns:
- Work item name
- Work item type
- Assigned to
- State
- Iteration Path
- Area path
- Tags
- Description (text formatting might change slightly)
- Acceptance Criteria (text formatting might change slightly)
- Remaining Work
- Effort
- Backlog Priority
- Priority
- Value Area
- Business Value
- Time Criticality
- Target Date
Fields not migrated with this method:
- Any formatting in the description field should get exported as HTML, including pasted images, but the img src will still be the source project
- Original creator
- Date created
- Attachments
- History
- Other links in work items i.e.: related to, affected by, changeset, hyperlinks…
Excel Office Integration Tools
- Create matching area paths / iteration paths
- Create the query with the source work items and the columns/fields you want to export
- Create the same query in the target project. I like to use the Wiql Editor to be able to easily copy/paste the query to the target project, sort of like a copy/pasting a SQL query
- Open up the source query in Excel, using the ‘New List’ button under the Team ribbon
- Open up a new Excel sheet and load the target query.
- The target query should be empty; it just should have all of the columns in the same order
- This seems to work better in new instance of Excel vs. new tab in same sheet
- Use the ‘Add Tree Level’ button to create the same number of ‘Title’ columns that the source query has - for example, if migrating Epics, Features, User Stories, Tasks, you would have Title 1, Title 2, Title 3, Title 4 in your source query
- Copy all of the content - except the work item ID - from the source query table into the target query table
- Fix any ‘Assigned To’ names, Area Paths, Iteration Paths, etc.
- Here’s a slightly tricky part - the work items have to be saved as New (or To Do for a task with the Scrum template)
- Excel will show a validation error for work items that have a non-new state
- Replace each state with ‘New’ or the new equivalent
- Assuming there are no more validation errors, ‘Publish’ the work items and wait (tip: I’ve found that any more than 1000 at a time and Excel will start to choke up)
- Now that the work items are published, do not refresh! You want them in the same exact list as you’ve copied them in - you can then return to your original query and copy the entire state column and paste it on top of the state column in the target table
- Publish again - the imported work items should have their original states now
Export/Import CSV
- Create matching area paths / iteration paths
- Create the query with the source work items and the columns/fields you want to export
- Export the query as CSV - click the ellipses in the upper right and ‘Export to CSV’
- Open the CSV and remove all of the Work Item IDs from the Work Item ID column
- Modify the CSV to change any fields that you want to ahead of time, such as area path / iteration paths
- In the target project, go to Boards > Work Items - there is an ‘Import Work Items’ button
- Import the CSV and resolve any validation errors
- Excel will show a validation error for work items that have a non-new state
- Replace each state with ‘New’ or the new equivalent (i.e.: ‘To Do’ for Tasks in the Scrum template)
- You can use the Shift key select multiple work items, right click, and edit these items in bulk
- Once all the validation errors have been resolved, click the ‘Save Items’ button in the upper left
- To put the original states back, from this same screen, click the ‘Export to CSV’ button - the CSV exported here with the new Work Item IDs should be in the same order as the query that was originally exported/imported. You can then return to the original CSV and copy the entire state column and paste it on top of the state column in the newly exported CSV
- ‘Import from CSV’ the new CSV that has the new Work Item IDs and the original state
- ‘Save Items’ again - the imported work items should have their original states now
Moving work items to a project to a different organization - full fidelity but harder
There are a couple tools to do this, but the tool that I have the most experience in is the nkdAgility/azure-devops-migration-tools tool. Microsoft has a tool, Microsoft/vsts-work-item-migrator, but I have not used.
If you are going to go down this route, I recommend checking out Martin’s video about how this works and how you can configure the tool. Since the video was posted, the configuration and ‘Processors’ have changed slightly. Enabling and modifying the processor settings is how you configure the various components you want migrated. There is additional documentation for the tool on this page, and more information specifically on the work item processor on this page.
It’s a great tool and it works really well, but one thing I found difficult when I got started was getting a sample configuration file to use. Now, I haven’t used the migrator tool in a while, but I do have a v11 configuration file that I have used. Specifically, I have used version 11.9.34.
My sample configuration file is found in this gist.
Search for the string "Enabled": and you will find the different processors that you can enable. In the sample configuration, the only enabled processor is the WorkItemMigrationConfig processor. You will need to modify the WIQLQueryBit to meet your needs. In the example highlighted below, the WIQL is going to migrate all User Stories, Tasks, Features, Epics, Bugs, and Test Cases - but not Test Suites and Test Plans (these are migrated in a the TestPlansAndSuitesMigrationConfig processor). If you were only migrating work items under an area path, you would add another clause, such as AND [System.WorkItemType] UNDER "MyArea/Path".
Example:
1
2
3
4
5
6
7
8
9
10
11
12
13
14
15
16
17
18
19
20
21
22
23
24
25
26
27
      {
        "$type": "WorkItemMigrationConfig",
        "Enabled": true,
        "ReplayRevisions": true,
        "PrefixProjectToNodes": false,
        "UpdateCreatedDate": true,
        "UpdateCreatedBy": true,
        "BuildFieldTable": false,
        "AppendMigrationToolSignatureFooter": false,
        "WIQLQueryBit": "AND [System.WorkItemType] IN ('User Story', 'Task', 'Feature', 'Epic', 'Bug', 'Test Case') AND [System.WorkItemType] NOT IN ('Test Suite', 'Test Plan')",
        "WIQLOrderBit": "[System.ChangedDate] desc",
        "LinkMigration": true,
        "AttachmentMigration": true,
        "AttachmentWorkingPath": "c:\\temp\\WorkItemAttachmentWorkingFolder\\",
        "FixHtmlAttachmentLinks": false,
        "SkipToFinalRevisedWorkItemType": true,
        "WorkItemCreateRetryLimit": 5,
        "FilterWorkItemsThatAlreadyExistInTarget": true,
        "PauseAfterEachWorkItem": false,
        "AttachmentMaxSize": 480000000,
        "CollapseRevisions": false,
        "LinkMigrationSaveEachAsAdded": false,
        "GenerateMigrationComment": true,
        "NodeBasePaths": [
        ],
        "WorkItemIDs": null
      }
Run Migration
Here is a high-level list of steps that you need to do in order to run the migration:
- Add the
ReflectedWorkItemIdfield to each of the work items you are migrating in both the source and target project. I believe you can get away without adding it to the source project, but then it makes it impossible to re-start a migration - Install the version you want
choco install vsts-sync-migrator(oh yeah, this only runs on Windows only the last I checked)- Or download from the releases page; I have most recently used version 11.9.34
- Set up your configuration file - my sample configuration file is found in this gist
- I usually run the Area Path processor (
TfsTeamSettingsProcessorOptions, which referencesTeamSettingsSourceandTeamSettingsTarget) by itself first to make sure the area path / iteration nodes are created. Decide if you want to enablePrefixProjectToNodes, where it will prefix the source project name in the area/iteration structure - Command to run migration and save the log to file:
migration.exe execute -c configuration.json > log.txt
The migrator has pretty good output logging, just search the output log file for error to work through any errors you have.
Pro-tip on running the migration: If you can, run this inside a virtual machine inside of Azure so you have the best possible internet capabilities and don’t have to worry about your computer falling asleep.
Old, bust maybe useful notes: I have a lot of notes in an old README.md, but it’s from v7.5 circa summer 2019, so it’s probably not super relevant, but including here in case anyone can glean anything from it. There are some additional explanations on what the various setting are for the WorkItemMigrationConfig processor. I also have an old configuration file from v8.9.x that might be helpful to some; I had a lot of success with it in July 2020. The WorkItemMigrationConfig processor docs for the older versions can be found here.
Other Useful Scripts
- Azure DevOps - Create Iterations PowerShell Script (but you should be able to use this for areas as well, just replace
/Iterationswith/Areas)
Conclusion
Migrating work items can be easy but can easily be made complicated if things such as history and attachments are a requirement. I mean, who really looks at the work item’s history anyway? I am a bigger fan of migrating the work items as is and leaving the work items in a read-only state in the source project that can be referred to for some time if history is needed.
But obviously, sometimes this isn’t possible, so that’s why an article like this exists! I hope someone finds this helpful down the line. Feel free to leave any additional tips that you’ve found in the comments, or feel free to reach out for additional strategies you are considering. Good luck!